Now that we have created all components needed in our process, it’s time to connect the dots and create our business-process. We need a business process engine which can pick up the message, enrich it, act upon it, then decide what to do with the result. This is where the Logic Apps comes into play. Logic Apps is an Azure product which as per Microsoft “provides a visual designer to model and automate your process as a series of steps known as a workflow”. For detailed information about Logic Apps, please visit https://docs.microsoft.com/en-us/azure/logic-apps/
Before I start, I’ll present the process again just for you to have it clear in your mind

As you can see, the Logic App picks up the messages from the service bus, calls the storage table to get the Web API URL, calls the Azure Function to generate a unique id for the message, then calls the API to save the customer, then received the response, and puts it in a failed queue in case of failure, or sends the response back to the client in case of success. That’s our simple business process again.
So, back to the azure portal, to the resource group blade, click “+Add”, search for Logic App, select it from the results, and click “Create”
Fill the properties of the Logic App as per your preference and hit “Create”. Make sure to always use the same location as the resource group location to keep your resources in the same location and thus minimize the costs.

Go back to the resource group main blade and hit “Refresh”, the Logic App should show among the other resources you created previously

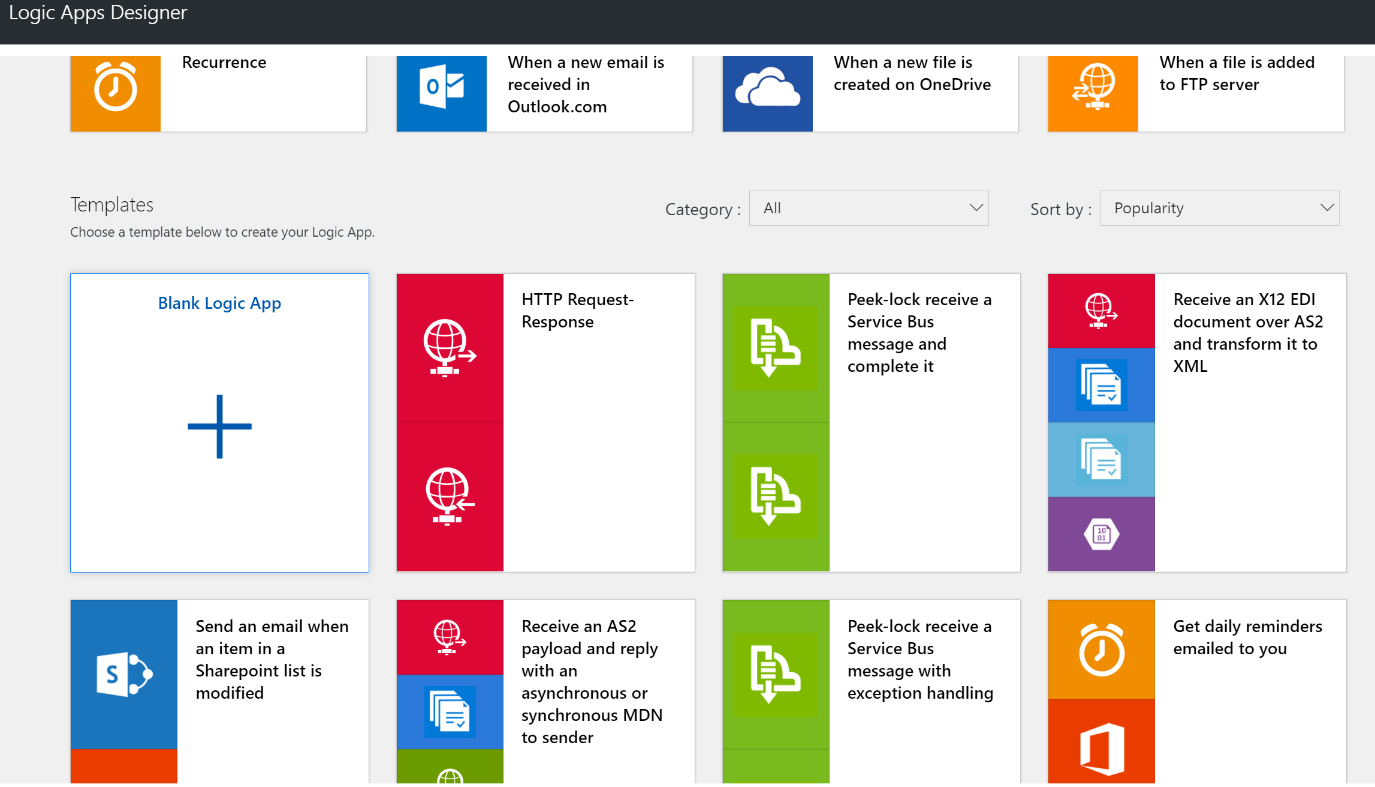
Click on the Logic App name to navigate into the Logic App designer. You are presented with a set of predefined “start-up” templates to start with, which is a nice option. But for us, let’s start from scratch for now to grab the full experience of creating a logic app. Click the “Blank Logic App” option to start by a bank logic app.
A blank Logic App opens waiting for you to set the trigger of this Logic App. In short, you need to start off by a “trigger”, which is how this Logic App will be fired. Through an Http call? A message written into the service bus? A document uploaded into SharePoint? Etc. After adding your trigger, you can then start adding either an “action”, which allows you to do “something”, or a “condition”, which allows you to make a decision to fork into multiple paths.

Since we want to fire our logic app when a message written to the service bus subscription. Let’s set that up. Search for service bus, then select the option: “Service Bus – When a message is received in a topic subscription (peek-lock)”. We want the peek-lock option to ensure reliability. We don’t want to delete the message from the topic subscription until we are sure we action-ed it, whether sent back a successful response or a failure email to the client.

Select the topic name, subscription, and frequency of polling from the service bus

Now that we have picked up the message, we are ready to start taking actions and applying our logic. The first thing I like to do is to add a step to decode the message, as it is received base64 encoded from the service bus. You can know that and view what’s exactly happening if you start testing your logic app after each step. I won’t be doing that here, but I’ll tell you how before I go deep into the implementation.
You can start by sending a message to the service bus topic (as we’ve seen in Article 3), the logic app will pick it up, then from the “Runs History” part of the Logic App blade, you can see all previous runs. Clicking on a certain instance will open a runtime view of the logic app where you can see the actual inputs and outputs from each step as shown below

Having explained this efficient and crucial troubleshooting method, let’s continue building our logic app. So, as I was saying, let’s decode the content of the input. For that, let’s click “+ New Step” -> “Add an Action”, search for “Compose”, and select “Data Operations – Compose”

Click on the three dots on the top-right corner of the shape and click “rename”, then rename the shape to “Decode Input”. In the code behind, the logic app will replace spaces by an underscore for the shape name.
Click the Input textbox of the “Decode Input” shape, from the dynamic content box that appears, select the “ContentData” element of the previous shape.

Switch to code view and make the following expression to decode the value of the “ContentData” element of the input is added
@base64ToString(triggerBody()?[‘ContentData’])
From now on, we can use the output of the “Decode Input” shape to reference our initial request rather than decoding the value each time we need it.
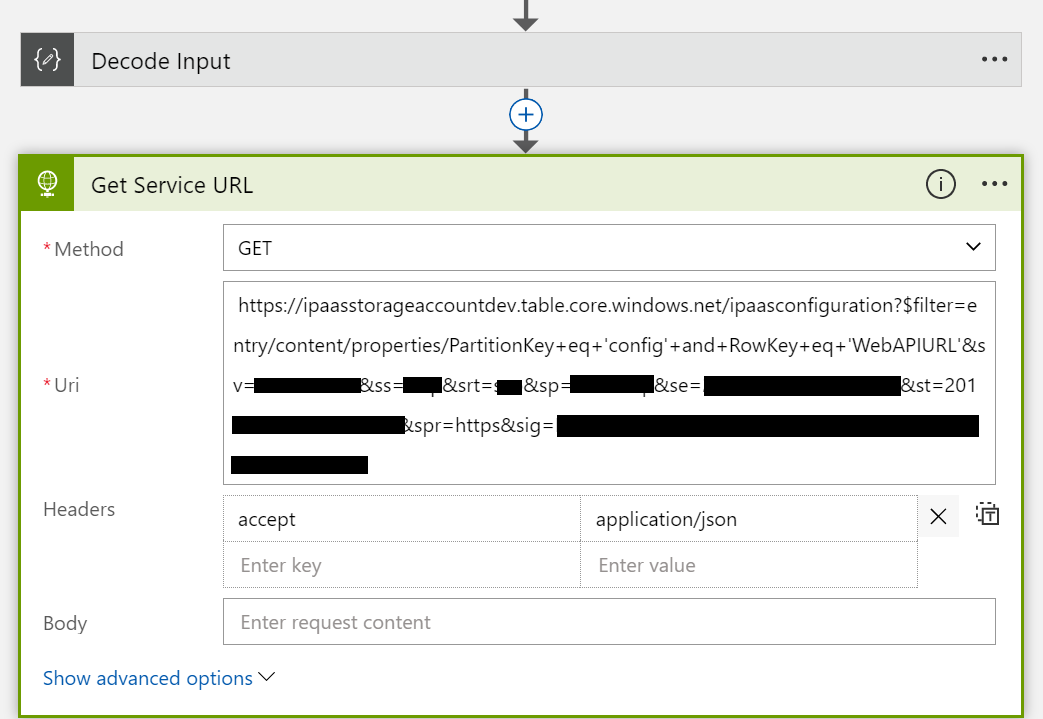
Next is to call the storage account table to get the entities Web API URL. For that, we need to do an HTTP Get call to the following URL:
Here we are calling our storage account table, filtering by the partition key and row key we defined in Article 4, and adding the SAS token which can be retrieved from the storage account “Shared access signature” page

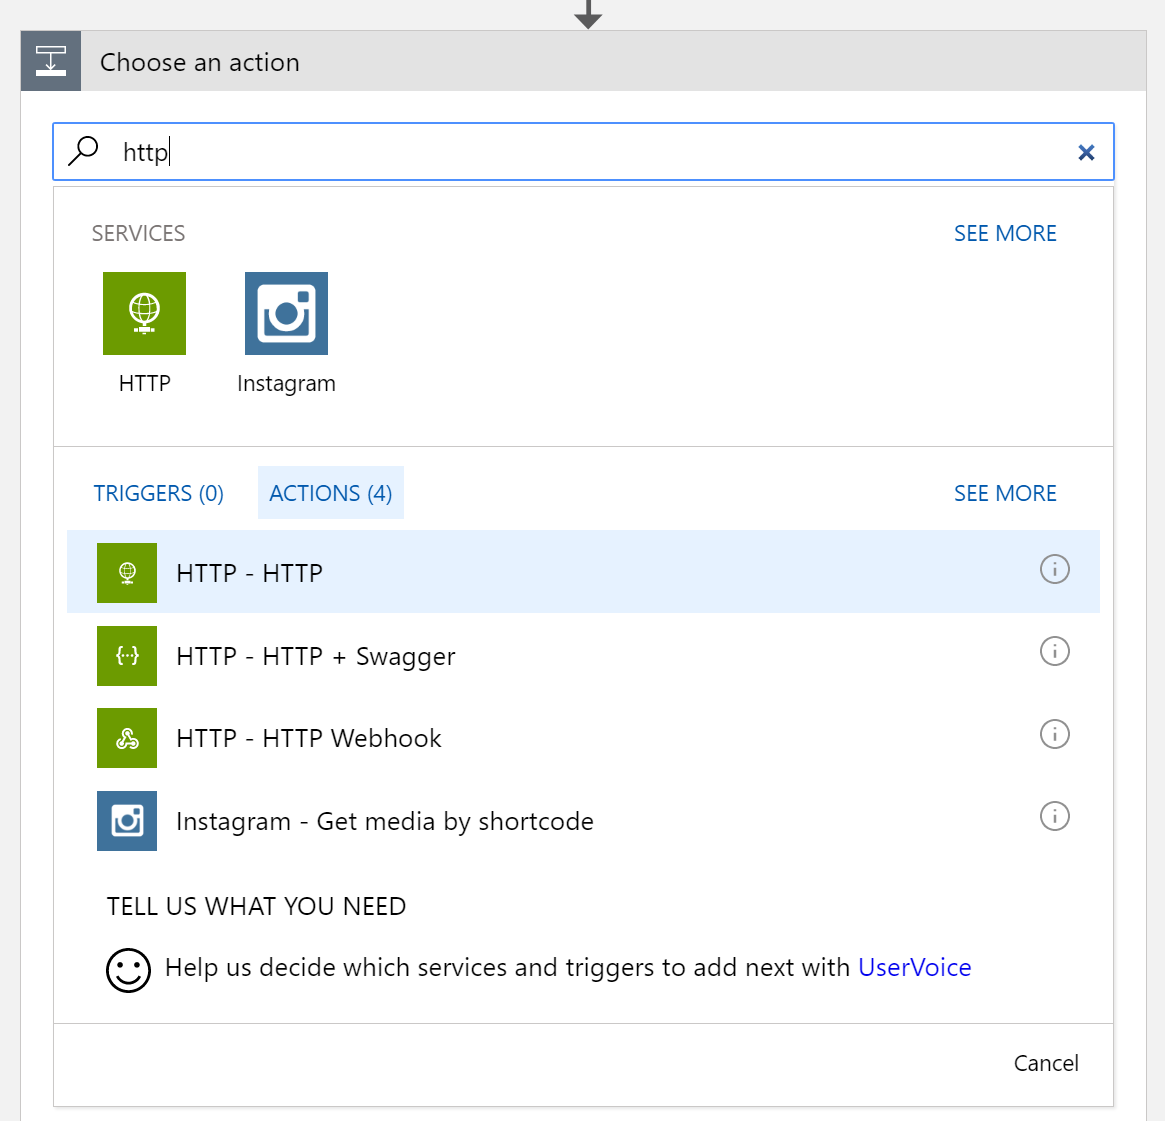
Ok, so to do that, let’s add an HTTP action to out logic app. Click “+ New Step”, select “Add an action”, search for “http”, and select “HTTP – HTTP” from the results
Rename the action to “Get Service URL”, then choose the “Get” method, paste the full URL in the Uri field and add the “accept” header as follows:
Save and test to make sure everything is fine. You should get a response similar to this one from the table storage:

Now, it’s time for our first condition in the process. We need to check if the response is a success or a failure. For that we need to add a “Condition” step. Click “+ New Step”, then “Add a condition”
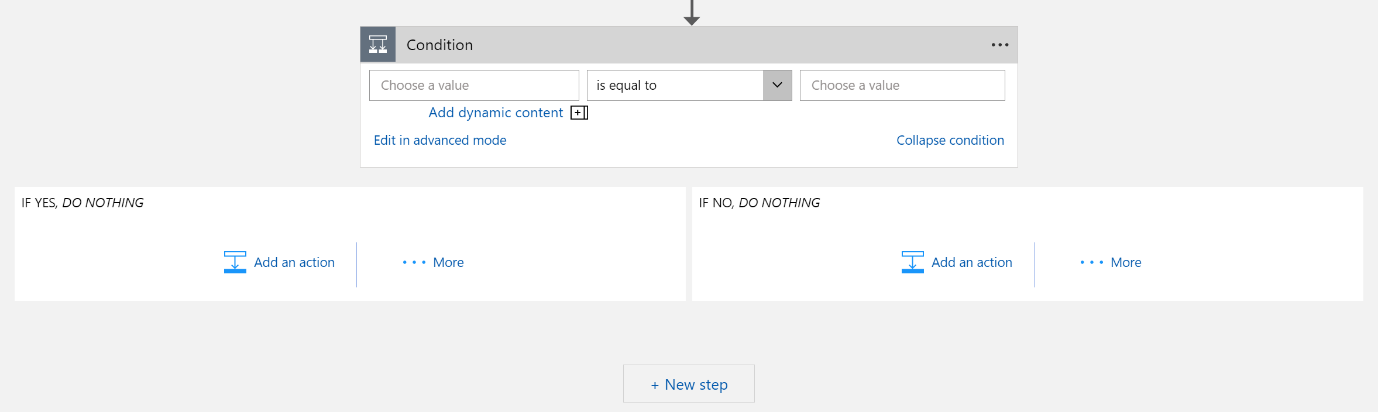
You might be tempted to select the condition based on the “Get Service URL” response status code equals 200, but that won’t work since if the previous step fails, this step will not even have the chance to evaluate.

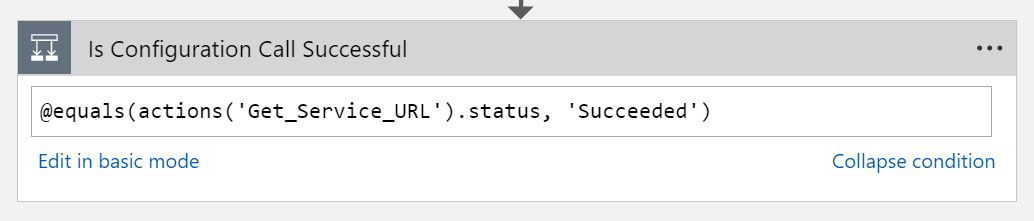
So, as I said, don’t do that. What you need to do is to check on the previous step status, is it “Succeeded” or “Failed”? To do that, click on “Edit in advanced mode” link and enter the following expression
Don’t forget to rename the step as well to give your process a meaningful visual layout.
One more thing is do, we need to specify that this step shall run after the “Get Service URL” weather the “Get Service URL” succeeded or failed. For that, click on the three dots on the “Is Configuration Call Successful” shape top right corner, and click “Configure run after”, then select “is successful” and “has failed” as follows:

Ok, so now let’s move on to implement the “sad” scenario, i.e, if the configuration service call has failed. In that case, we need to do three actions. First, send a message to the failures queue, so that the sendEmail function will pick it up and send an email to the user. Second, finish the item in the topic subscription, as we have “peeked looked” into it and it’s only locked until now and not deleted. Third, finish the Logic app with an error status code. This pattern will be implemented on all “sad” scenarios for all upcoming conditions with minor differences. Enough talking, let’s implement this branch.
In the “IF NO, DO NOTHING” condition branch, click “Add an action”, search for “service bus”, and select “Service Bus – Send message”. Rename the shape to “Send Configuration Error Email” and fill the properties as follows

Note that we are filling the content of the “to” property with a dynamic value retrieved from the input message email property. Using the “outputs(‘ShapeName’)” expression we get a handle to the output of the that shape, then we transform that into a json string using the “json” function, then we can access the needed property.
This is delicate here, and once you concatenate the dynamic variable, your expression might become invalid. Just make sure it’s like that in code view:
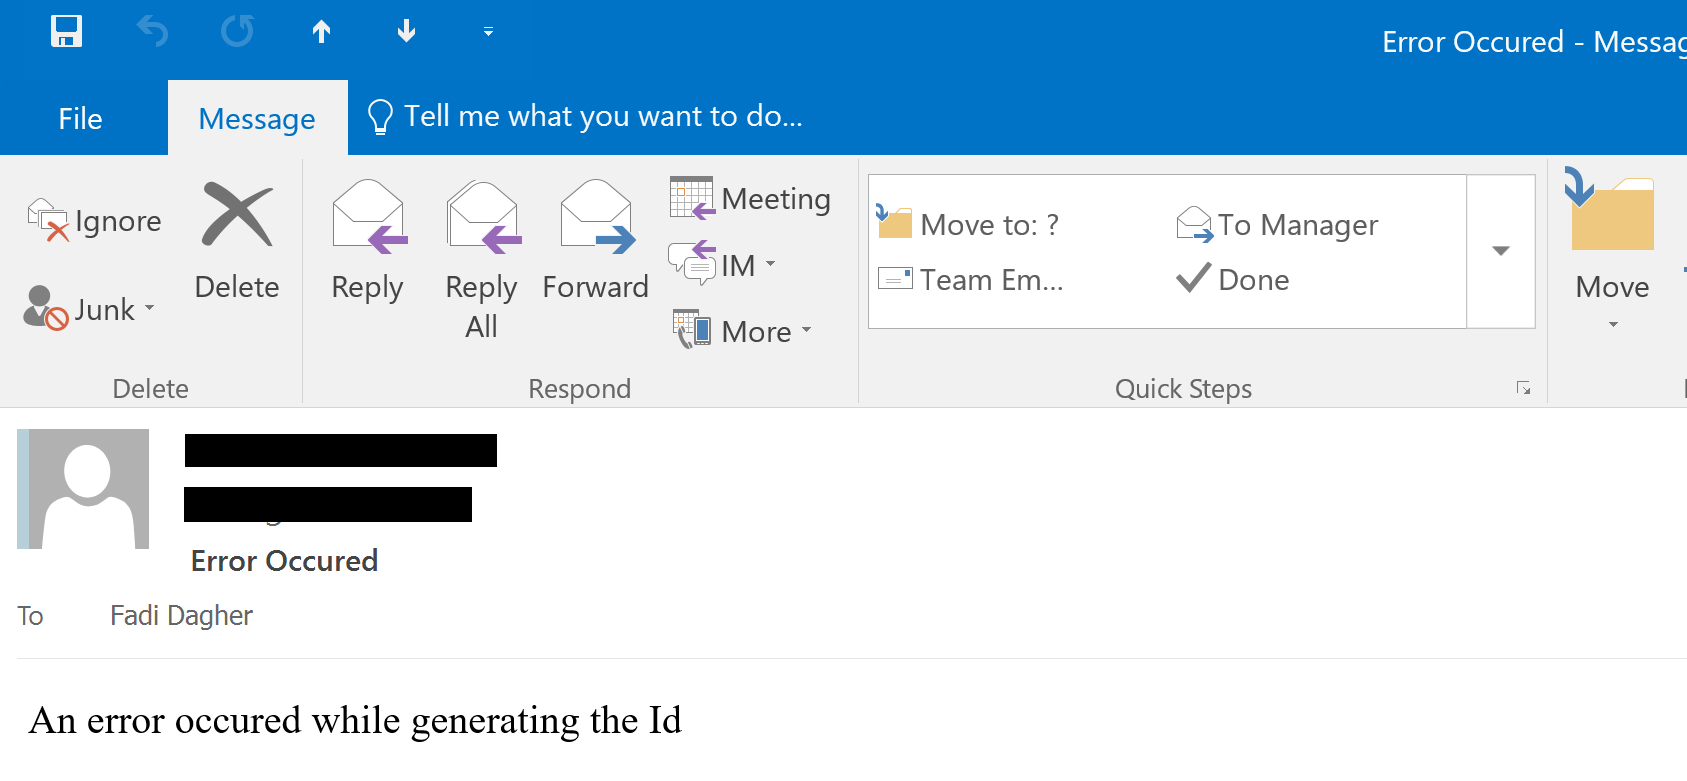
@{base64(concat(‘{ \”to\”: \”‘,json(outputs(‘Decode_Input’)).email,’\”, \”subject\”: \”Error Occured\”, \”body\”: \”An error occured while calling the configuration service\” }’))}
Next, click “Add an action”, search for “service bus”, select “Service Bus – Complete the message in a topic subscription”. Rename and fill the properties as follows

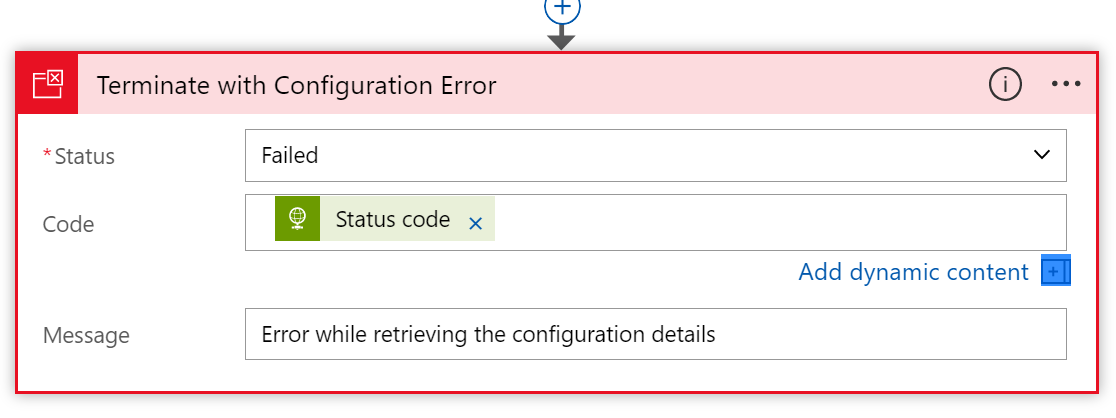
Finally, click “Add an action”, search for “terminate”, and select “Control – Terminate”. Set the code to the status code of the “Call Service URL” shape, and enter an error message as per your preference
This concludes our error branch for calling the configuration service. Now it’s time to move to the happy scenario, the “IF, YES” branch. The “IF NO” branch should look like this until now

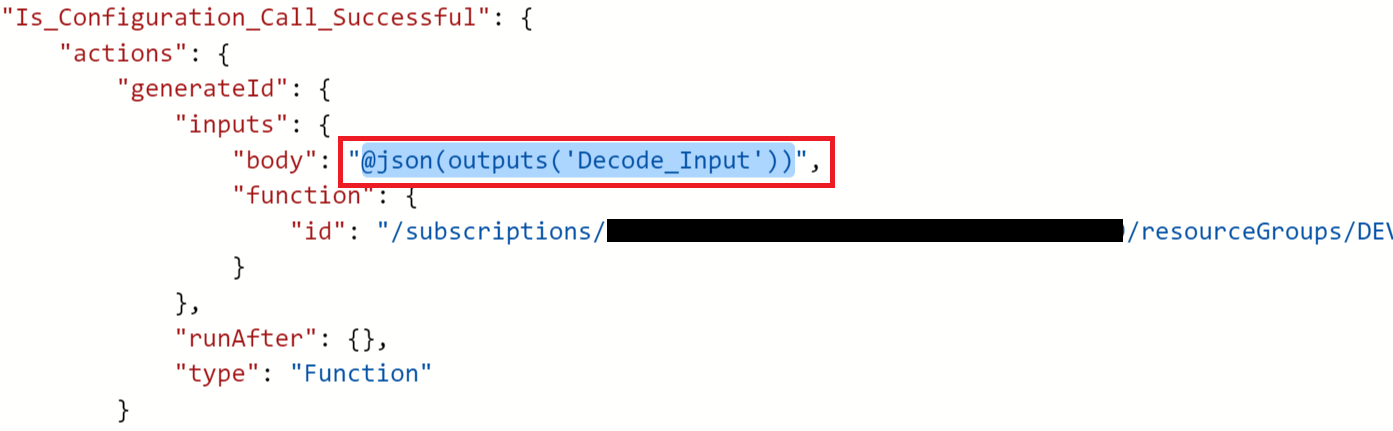
First, we need to call the “generateId” function to generate the customer number. For that, click “+ Add an action”, search for “azure functions”, and select “Azure Functions – Choose an Azure function”. Select “Azure Functions – ipaas-functions-dev” function app, then “Azure Functions – generateId”. Click on the “Request Body” textbox and choose the output of the “Decode Input” step.

One more thing, go to the code view of the logic app, search for the “generateId” step, and wrap the output of the “Decode Input” step by the json function since the function expects a json string.
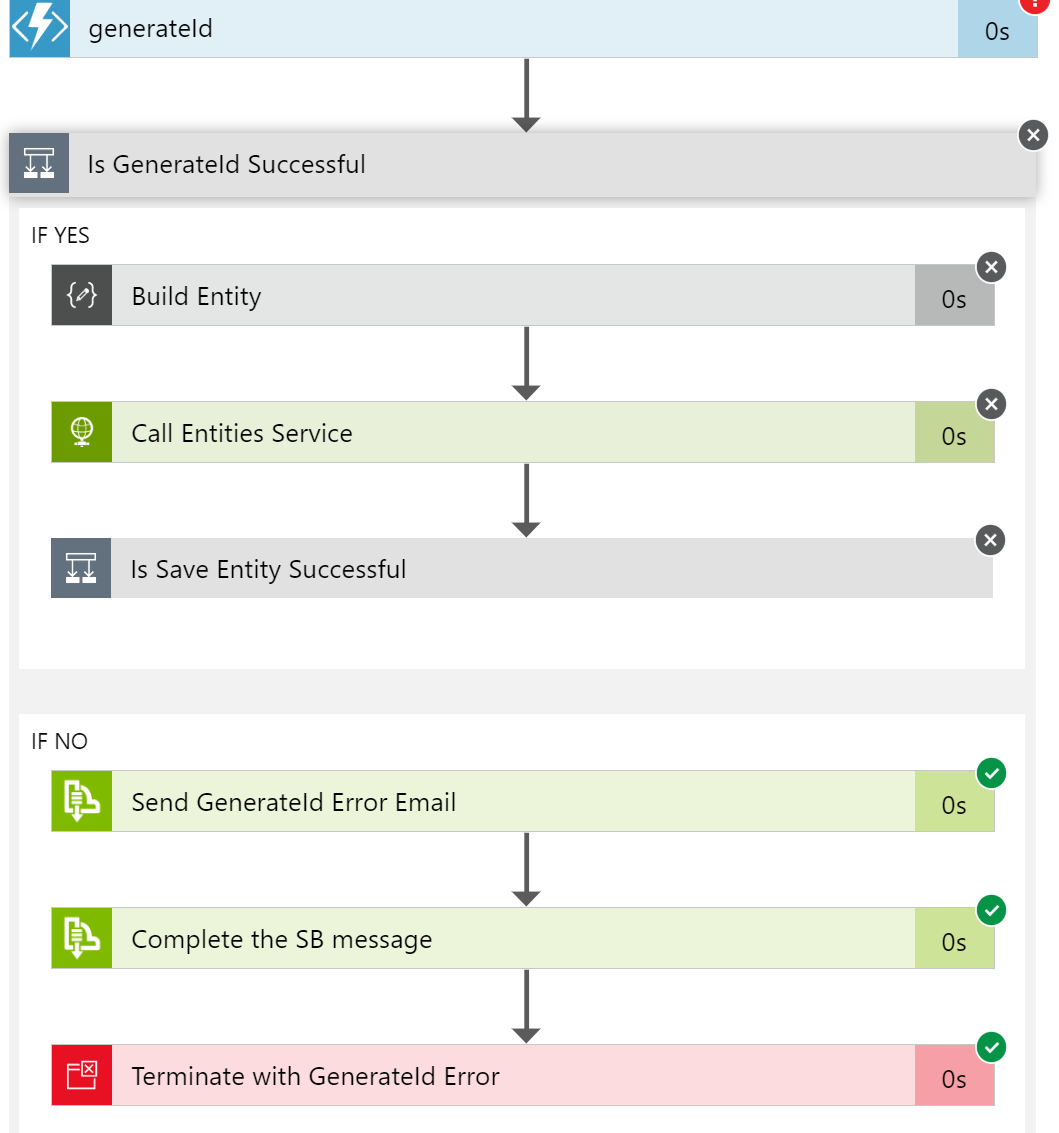
Now we need to do same what we did after the call to the storage table, check if the generateId call is successful or not, and in case not, send an error email, complete the topic subscription message, and terminate will an error. To do that, just follow the previous instructions, but provide different names and error messages. Also, don’t forget to change the “runAfter” element to allow the condition to run if the previous step succeeded or failed. After you are done, your new additions should look like the following:

In case our call is successful, we need first to prepare the correct payload to send to the entities web api, then call the web api to insert the customer. To do that, in the “IF YES, DO NOTHING” branch, click “Add an action”, search for “compose”, then select “Data Operations – Compose”. In the Input text box, we need only the properties payload of the full message that came out of the “generateId” step. So type the following expression:
@{body(‘generateId’).properties}
The shape should look like:

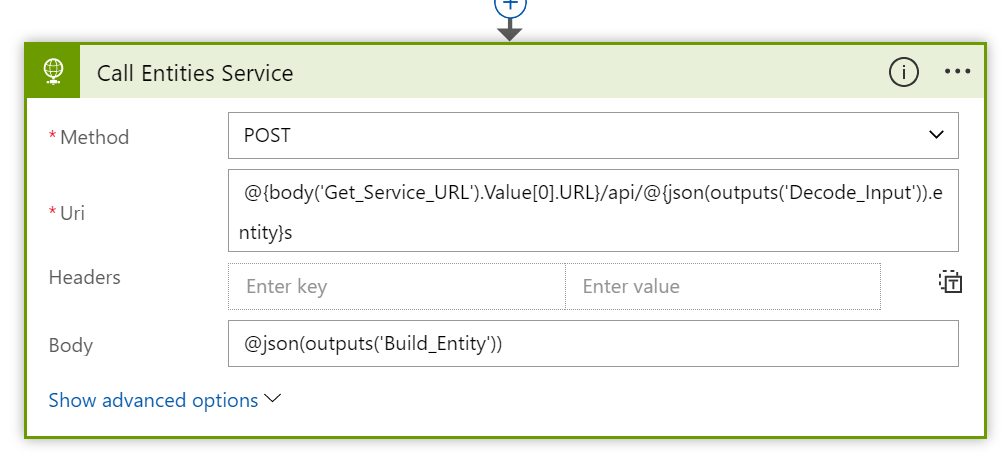
This is the message that the web api is expecting. So next, let’s add the call to the web api. Click on “Add an action” under the “Build Entity” step, search for “HTTP”, then select “HTTP – HTTP”. Rename the shape to “Call Entities Service”, select POST as the method, and enter the following expression for the Uri:
@{body(‘Get_Service_URL’).Value[0].URL}/api/@{json(outputs(‘Decode_Input’)).entity}s
Here we are taking the URL we got in the “Get Service URL” step, appending “/api/” to it, then the value of the entity field in the message, which is “customer” in this case, then appending an “s”. So the full URL will become:
http://devipaasentitiesapi.azurewebsites.net/api/customers
After that, add the output of the “Build Entity” step in the body field:
@json(outputs(‘Build_Entity’))
The shape should look like:
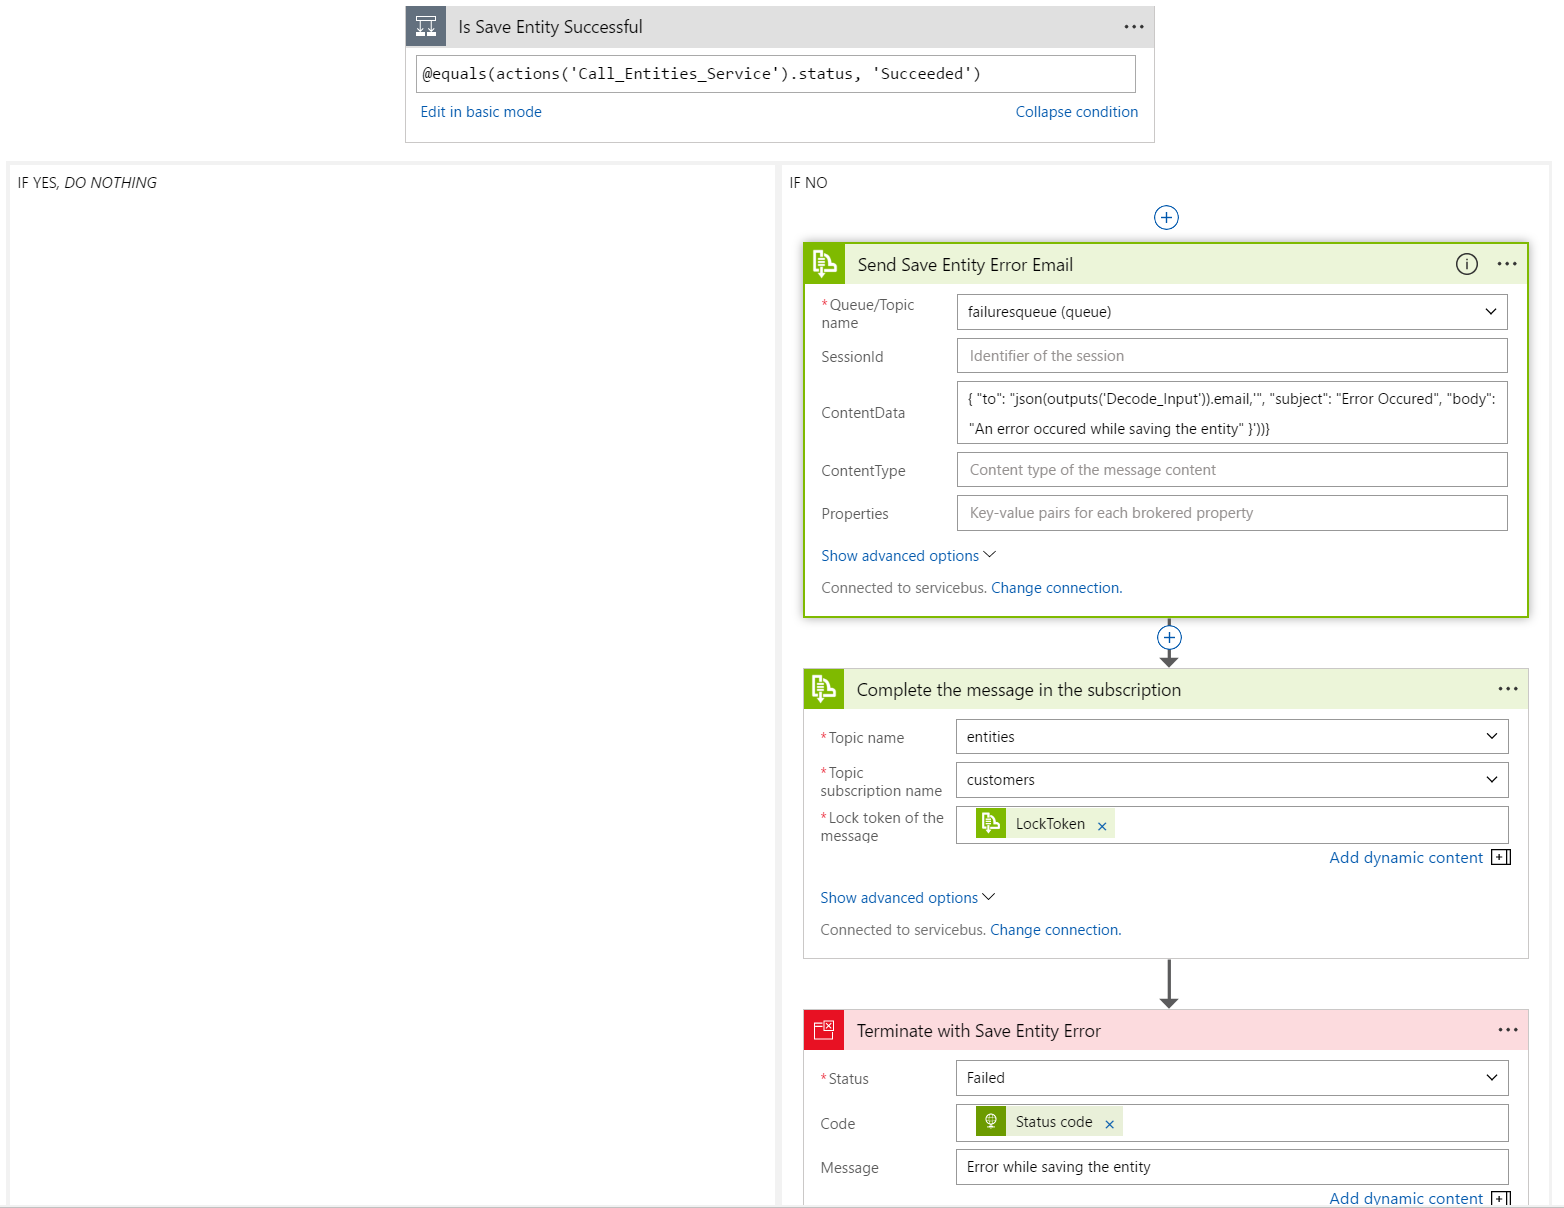
Now, we need to do one last error checking condition and failure resolution as we did twice before. We need to add a condition step, and in the failure branch, send an error email, complete the service bus message, and terminate with an error. You should be familiar doing that now, the new additions look like the below after they are done
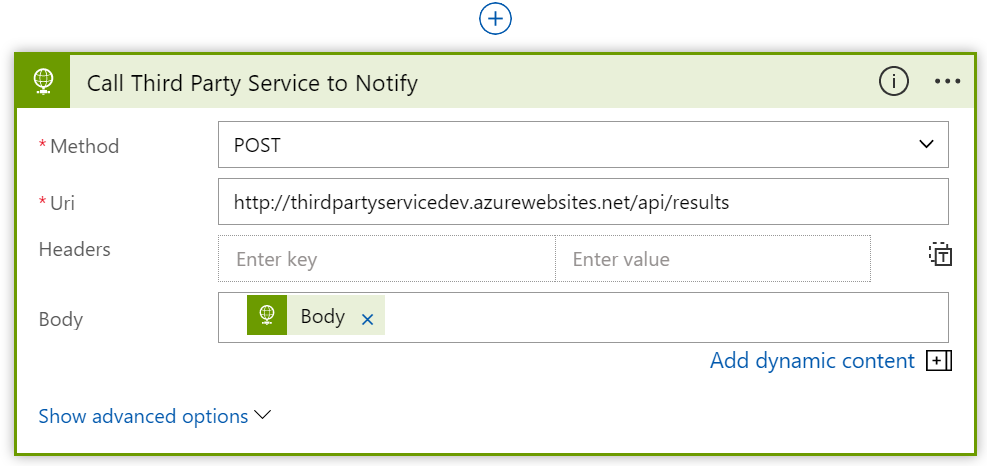
Finally, we have saved our customer, handled all exception scenarios, we are left with sending a successful notification message to the client and finishing the locked message in the service bus. The notification message is sent by means of a Web API call to a service owned by the client. For that I have created a dummy service called thirdpartyservicedev and hosted it under the following URL: http://thirdpartyservicedev.azurewebsites.net/api/results
So all we need to do is post the created customer to this URL. You should be familiar with how to do this now, just add an “HTTP – HTTP” action, set the URL to the above one, and the body to the output of the “Call Entities Service” shape.
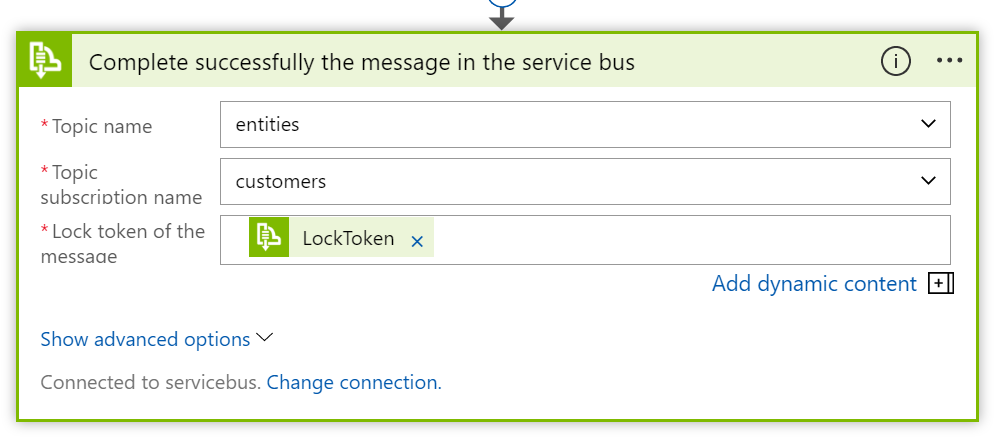
Having done that, let’s finish the service bus message. Add a “Service Bus – Complete the message in a topic subscription” and set its values as follows
The final business process should look like the following

To test your full process, send a message to the service bus topic and notice it has been picked up and processed by the logic app

Test a failure condition, modify the generateId function to return an error for example (I’ve set the prefix variable to null before the if-statement). Send a new message to the service bus “entities” topic and notice that the error handling branch will run in the logic app.
A message will be sent to the failures queue and the sendEmail function will pickup the message and process it

Finally, an email should be sent to the client.
That was a lengthy article! In this article we have created the business process that glues all of our previously created artifacts. For that, we used Logic Apps. Note that the same logic app can be extended to handle the insertions / updates of any type of entity with minor changes, but for the sake of brevity, I kept it targeted for customer insertions. In the next article, we will create the API Management instance that acts as a proxy between our environment and the outside world.