Article Goal: Create the SQL Database and wrapper Web API to manage the database
In this article, we’re going to create a SQL Azure database and an API App to manage this database. This is where our customers will get inserted and persisted.
SQL Azure DB is a relational database service running on Azure, so in more simple terms, it’s SQL server running on the cloud (with minor differences). For detailed information about SQL Azure, you can go to https://docs.microsoft.com/en-au/azure/sql-database/
On the other hand, API apps allows us to host and consume Web API’s on the cloud. It’s part of Azure App Service (in addition to Web Apps, Mobile Apps & Logic Apps). For detailed information about API Apps, please refer to https://docs.microsoft.com/en-us/azure/app-service-api/
Create an Azure SQL Database
So, let’s start by creating our SQL Database. On the DEV-IPAAS-RG resource group main blade, click the +Add button. Search for SQL Database, select it from the found results, and click “Create”

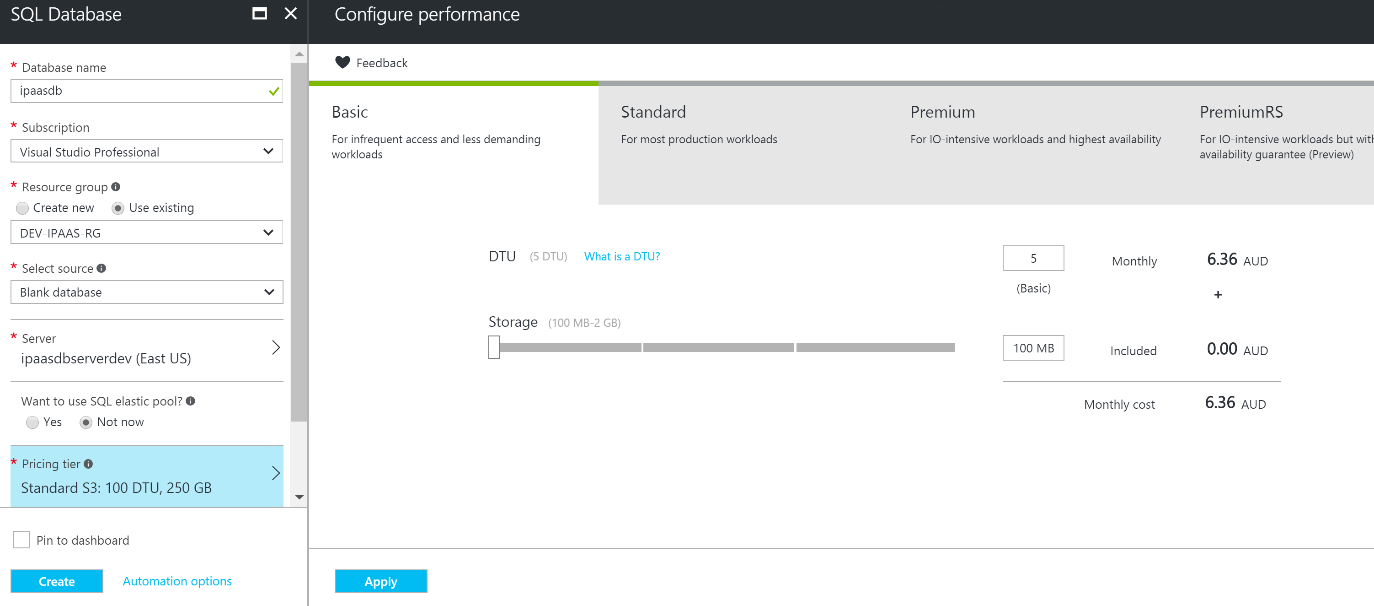
Fill the database properties, including the server properties as follows

Change the pricing tier to the minimum available (Basic), since this is for demo purposes. Click “Apply”
Then click “Create” and wait until the database and its server are provisioned

Once provisioned, the database and the server will appear among the available resource group resources

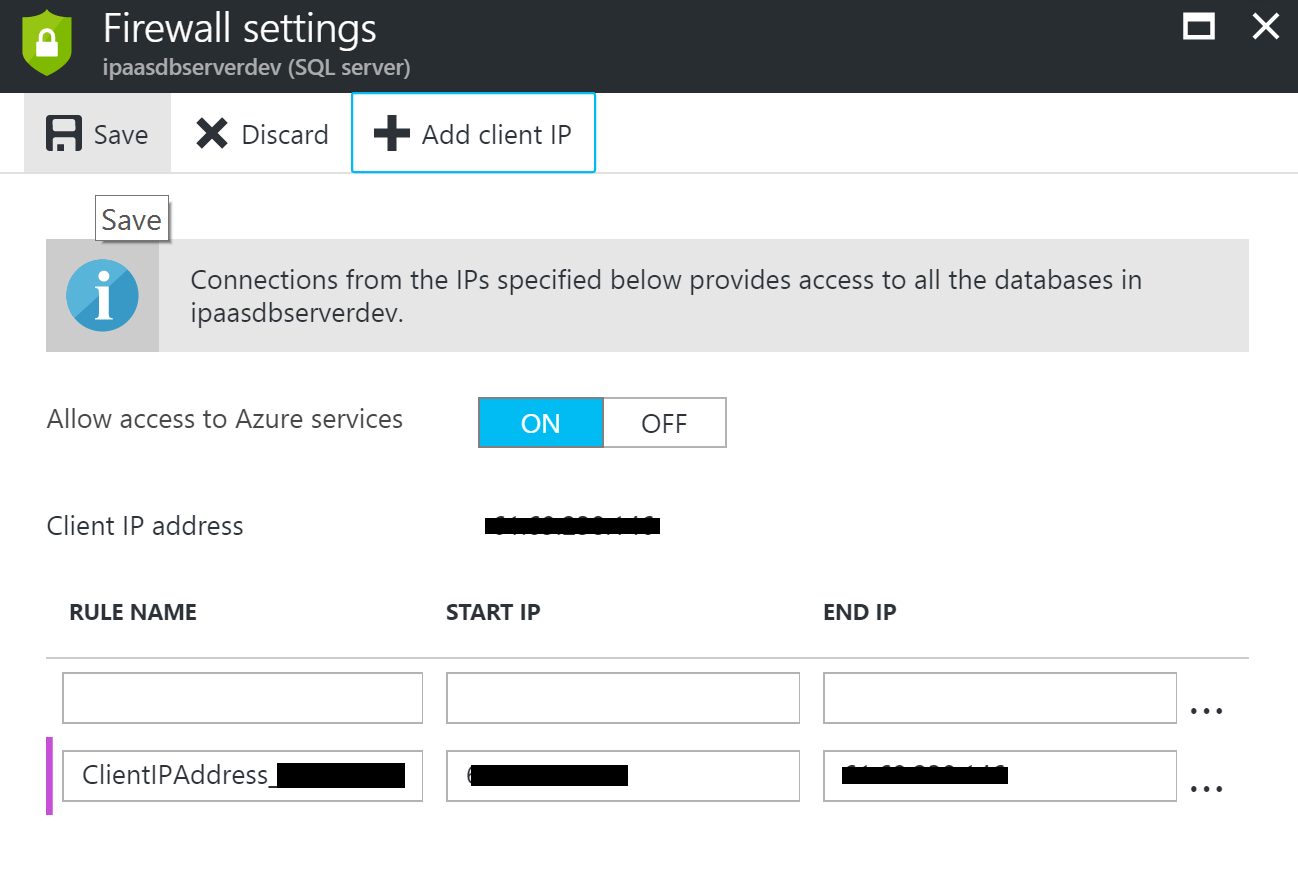
Click on the SQL Database to open the database blade, then click on “Set server firewall”. Make sure that “Allow access to Azure services” is “ON”, click “+Add client IP”, then “Save” to allow your machine to have access to the Azure SQL Server (By default no IP’s can connect to the SQL Server)
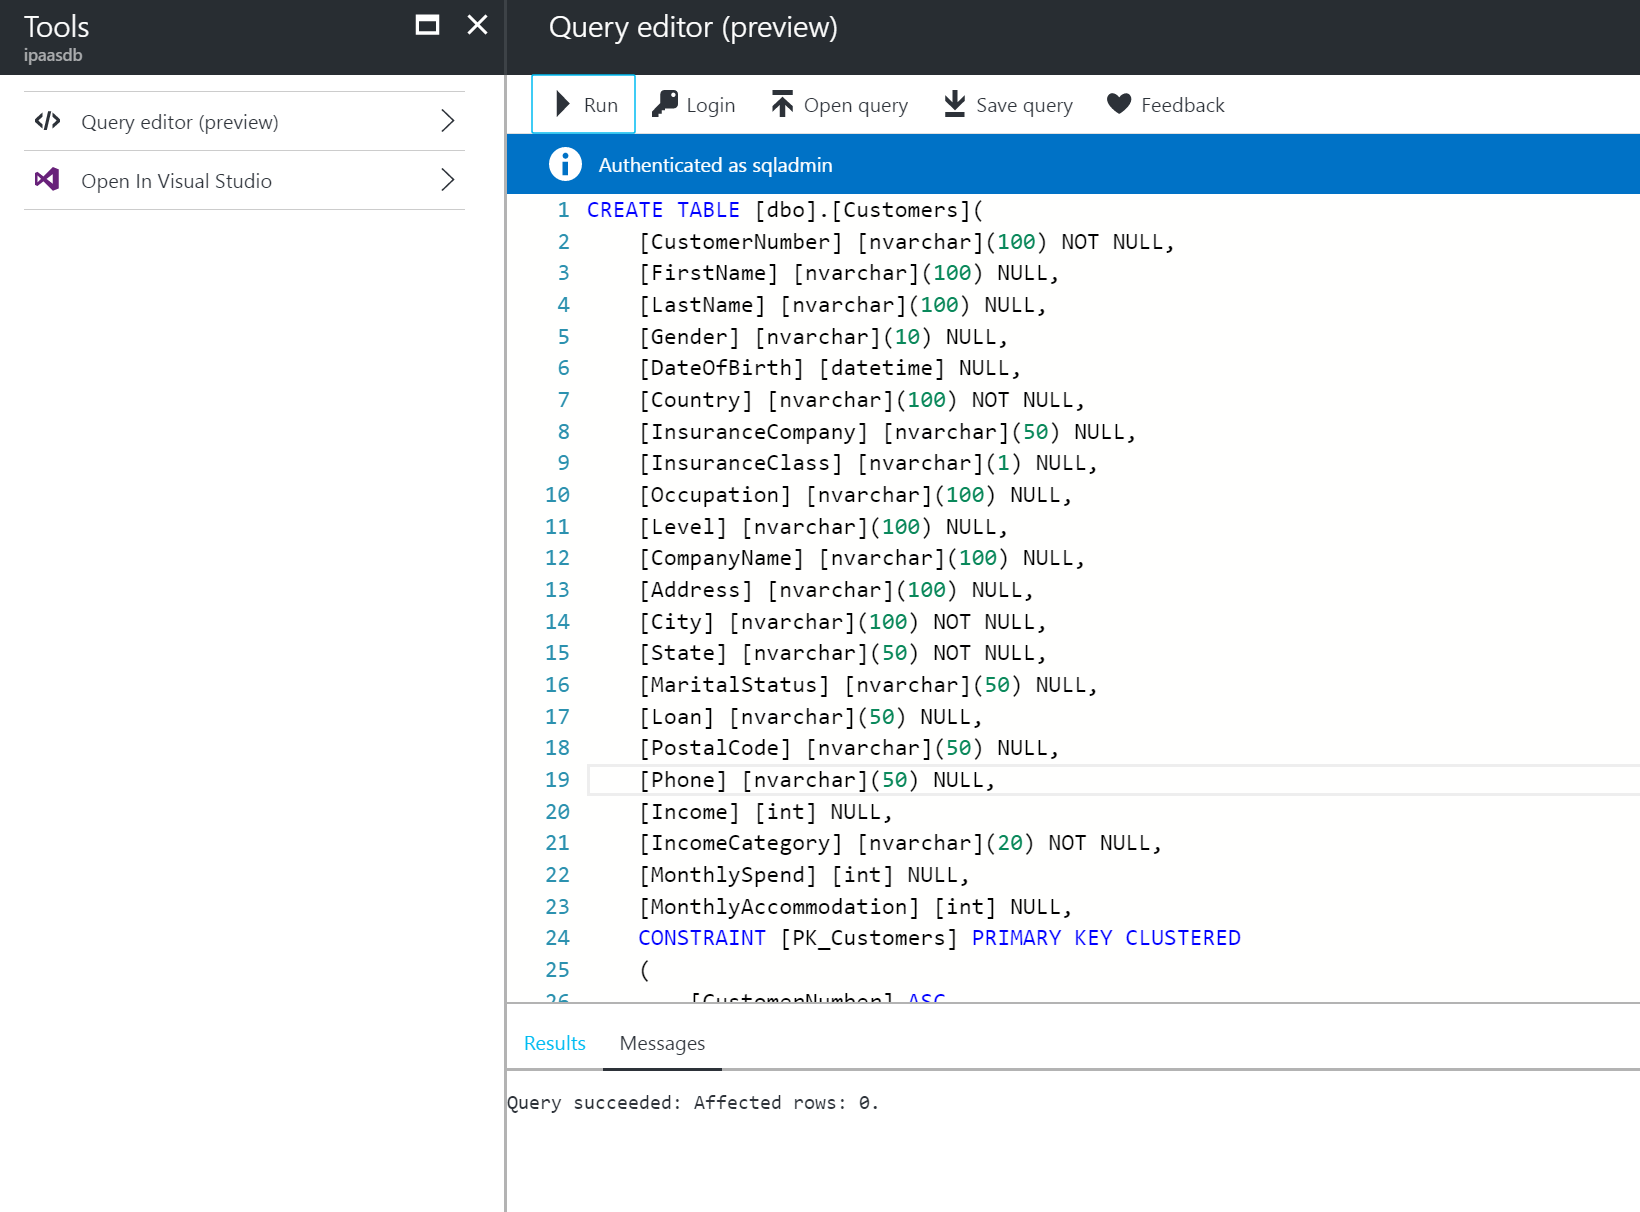
Now we need to create a table in the database, for that, we can use multiple tools such as visual studio or SQL Server Management Studio (SSMS). I’m not going to use any of them, rather, I will use a new portal feature called the Query Editor. So back to the database blade, click on the “Tools” icons on the top menu, select “Query Editor (preview)”, accept the terms, then click “Ok” to open the query editor.
After the query editor is opened, you are asked to login

Click on the “Login” button and enter the credentials you specified when provisioning the SQL server, then click “Ok”

Enter the “Customers” table script as follows then click “Run” to create the table
This concludes creating the database part of our scenario, next is creating the Web API and deploying it to the Azure API App.
Create the API App
Now that we have created the database, let’s create the wrapper API that will be responsible for managing the database. We’ll start by creating the Azure API App, then we’ll create a Web API project in Visual Studio, set it up, test the functionality, then deploy the code to the API App.
So let’s start. First of all, open the resource group blade and click +Add, search for API App, select it from the results, and click create

Click the App Service plan/location, create new, then select the appropriate pricing tier. I’ll chose free for the demo purposes

Fill the App Service Plan properties and click Ok

Fill the API App properties then click “Create”

Once provisioned, the API App and its App Service Plan should appear in the list of resource group resources.

As you may have noticed, the App Service Plan is nothing but the physical resource hosting your Azure resources. For more information about App Service Plans, please check https://docs.microsoft.com/en-us/azure/app-service/azure-web-sites-web-hosting-plans-in-depth-overview
Now that we have created the API App, let’s go on and create the Visual Studio Web API project. For that, open Visual Studio and create a new Project. Select the ASP.NET Web Application template, give it a name and a location

Notice that I placed the project in the Git repository location I created in the first article of the series. This will allow me to add the project files to Git later. This will come handy when I set the continuous integration and deployment in the final part of this series.
Ok, let’s continue. Click “Ok” and a new dialog will open to select a template, select Azure API App, then click “Ok” to create the project.

Now that the project is created, we’ll have to add the code to access the database and the Web API controller. I’ll use Entity Framework as an ORM to access the database as it’s the easiest, fastest, and neatest way to do so. Ok, right click the project and select Add -> New Item

Select “Data” from the installed templates categories, then chose “ADO.NET Entity Data Model”. Name it “Entities” or any suitable name, then click “Add”

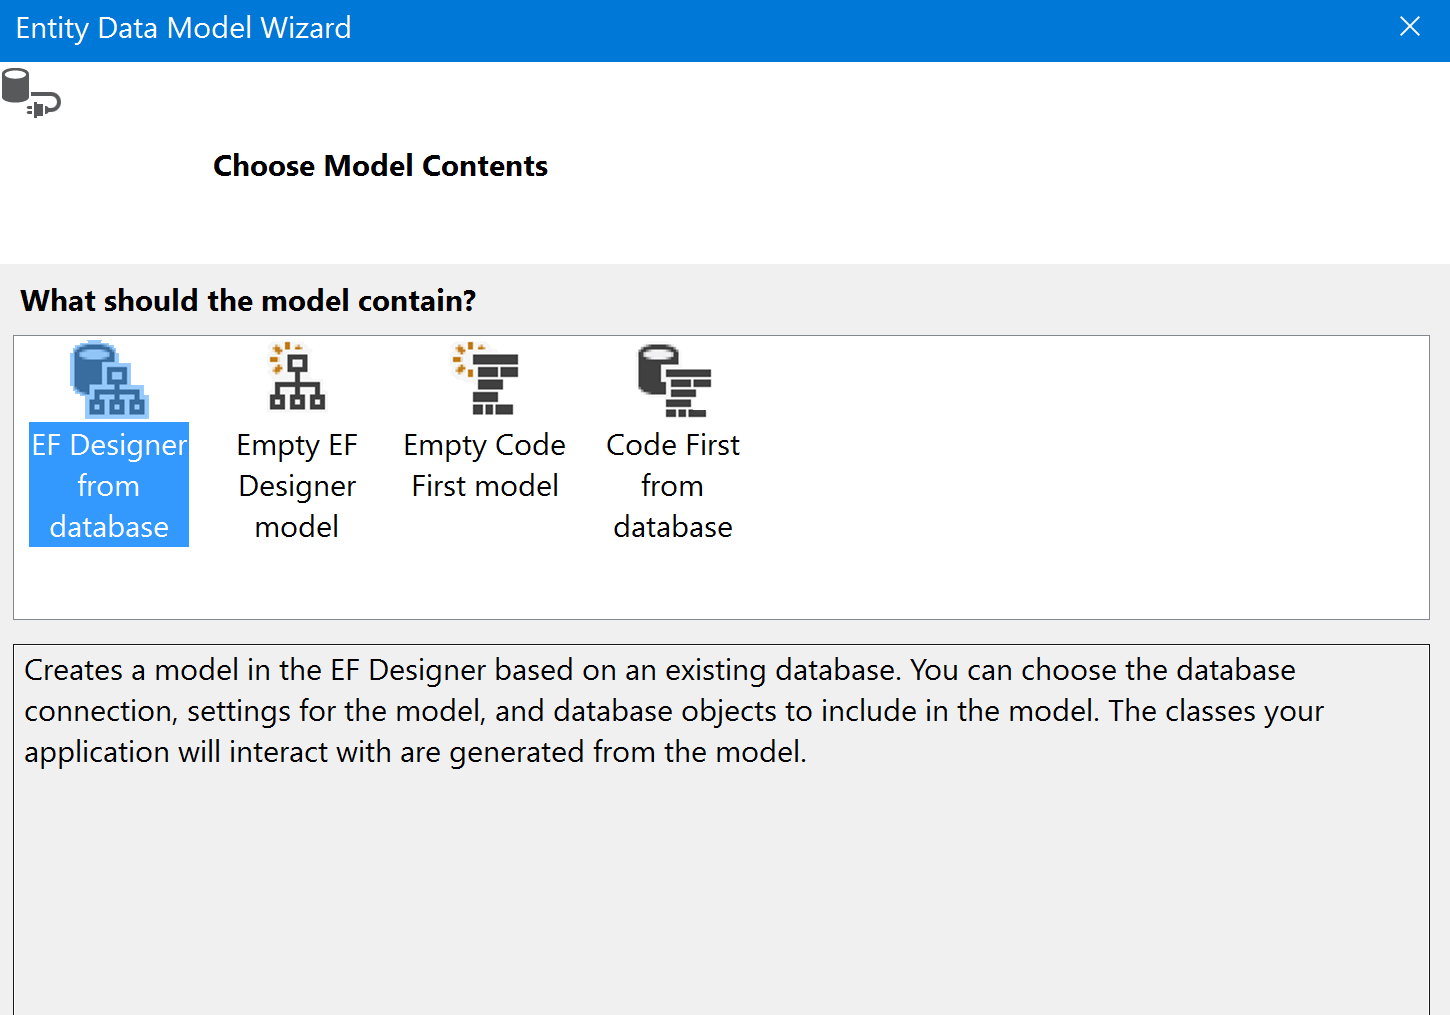
In the next screen, select “EF Designer from database” and click “Next”
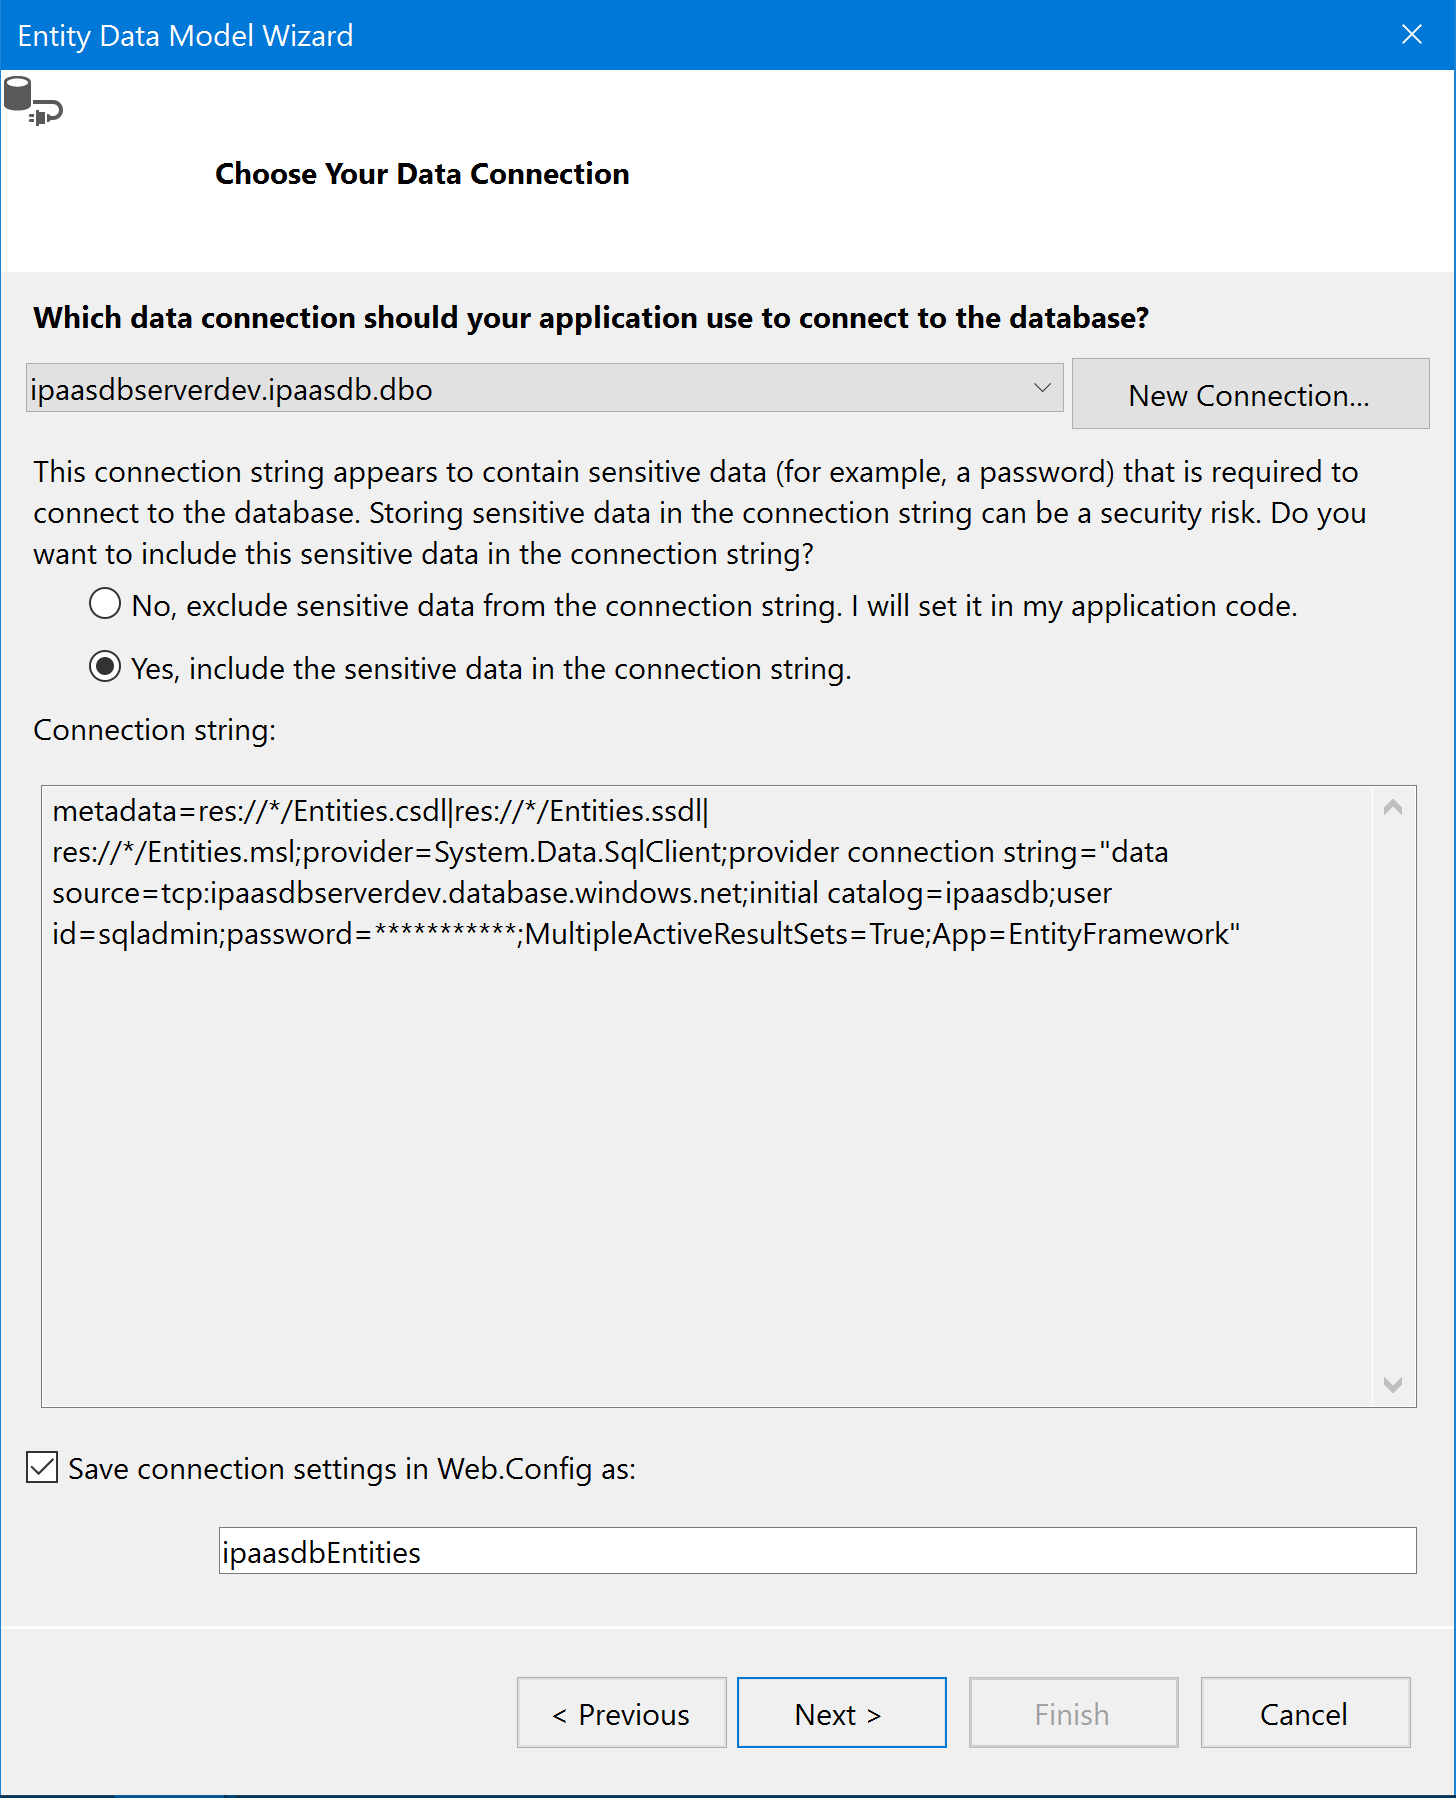
In the next screen, click “New Connection”, select “Microsoft SQL Server”, and click “Continue” to open the connection properties dialog. Fill the database connection information you defined previously (when provisioning the database server). Click “Test Connection” to validate the connection, then if everything is good, click “Ok” to get back to the data connection dialog.

Note that you might need to prefix the server name by “tcp:” for the connection to succeed. Optionally, you should also suffix the name by “,1433” which is the port used to connect to the SQL service.
Now we’re back to the data connection dialog, make sure to select the second option which is to store full information in the connection string, then click “Next”
In the next screen, chose the latest EF version. As of now the version is 6.x. Click “Next” and check the Customers table from the database.

Click “Finish” to create the Entity Framework data model containing only the Customers table (which is the only table we created in the database). You should get a couple of warning messages, just click “Ok” on them. Once finished you’ll see a data model diagram similar to this

Build the project before you continue in order to compile the generated classes. This is crucial for the next step to succeed. Now right-click the “Controllers” folder and select “Add -> Controller”

Select the Web API with EF option, then click “Add”

Select the “Customer” model class, and “ipaasdbEntities” data context. Name the controller “CustomersController” and optionally select “Use async controller actions” to run the code inside each action in an async manner (non-blocking). Click “Add” when done to create the controller with major HTTP verb actions fully implemented (GET, POST, PUT, DELETE actions)

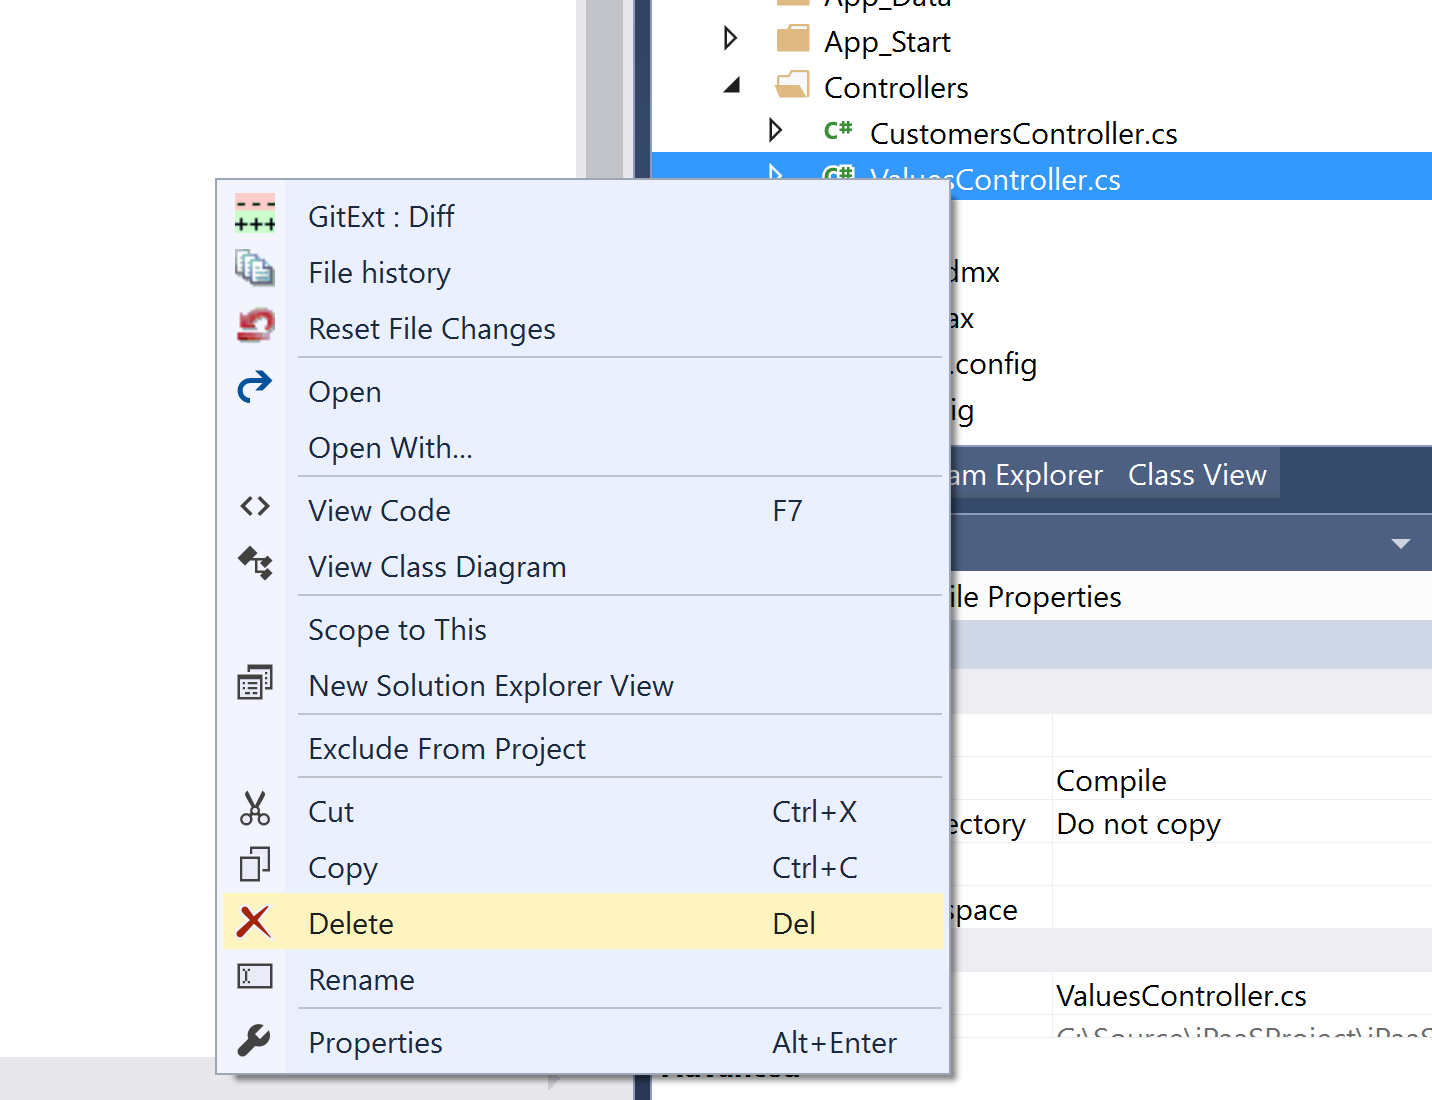
Before I forget, let’s delete the default values controller that gets created when we create the project as it’s not needed. Right-click on it and “Delete”
One more thing, when we created the project, swagger support was added automatically using the Swashbuckle NuGet package. Swagger is a definition language for JSON, similar to WSDL for SOAP. Although swagger is added, enabling Swagger UI, which is a tool that helps in testing our API’s, might be commented out in the generated code. To enable it, open the SwaggerConfig file in the App_Start folder and, if not already uncommented, uncomment the highlighted lines of code.

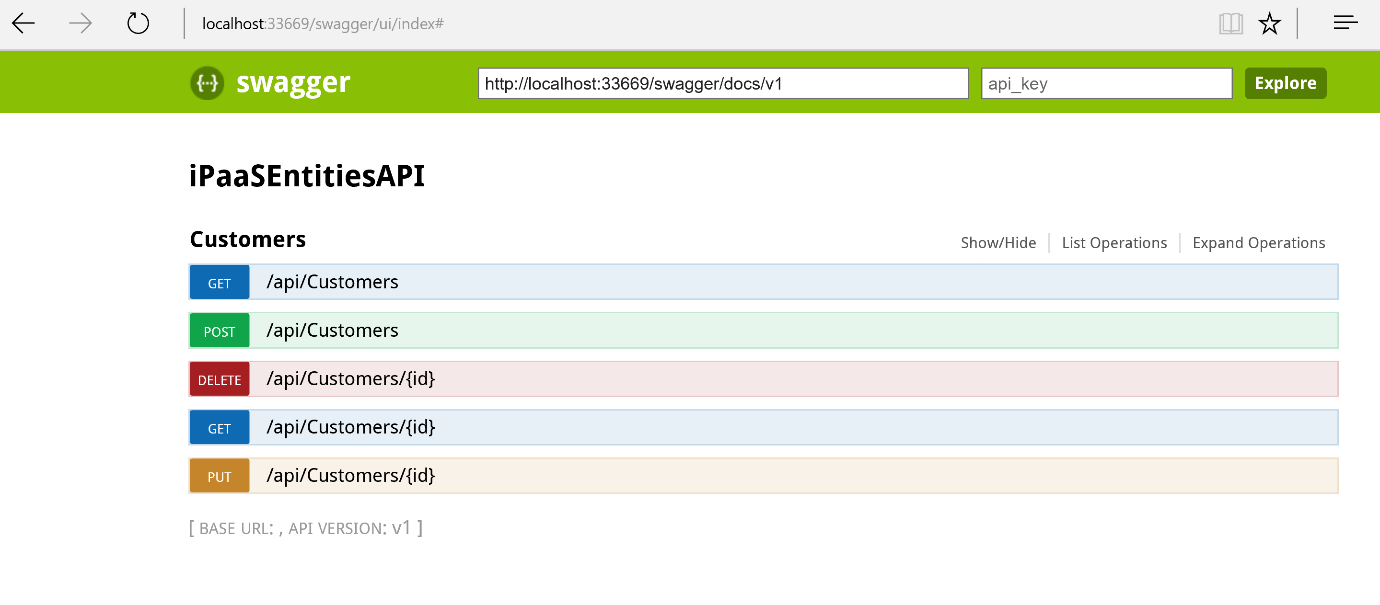
Press F5 to build and run the project, once the initial URL is opened, append to it “/swagger” to open Swagger UI
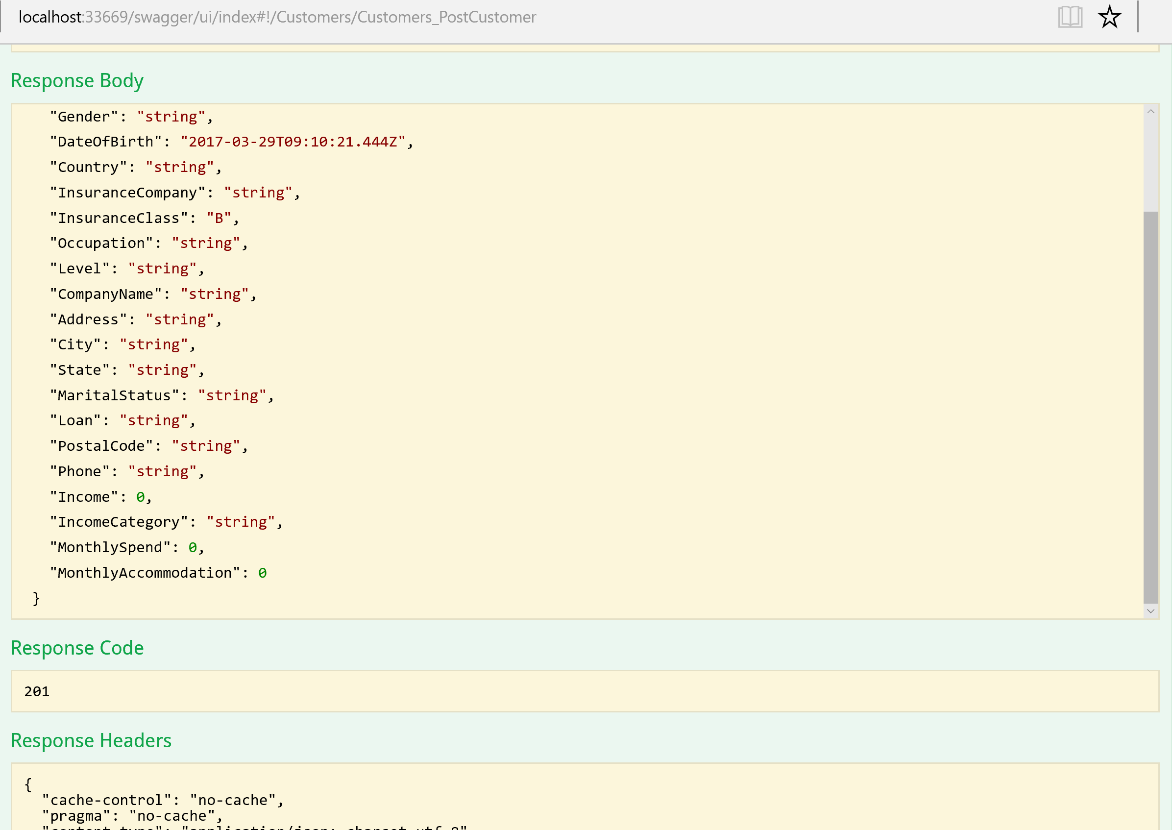
Click the POST /api/customers link to test the post method which inserts a record into the “Customers” database table. Click on the “Model Schema” textbox on the right, then will fill the sample message in the customer parameter value field on the right. Change the customer properties values as you wish, just make sure to use a single character value for the “InsuranceClass” property as it’s defined as a single character field in the database

Once your message is ready, click “Try it out!” to invoke the POST method in the API. You should receive a response code of 201 (Created)
To validate a customer is inserted, you have many options ranging from the browser URL, to using Swagger UI also, to SQL server management studio, and finally, the Azure Query editor we used before. I’ll use that again to continue leveraging Azure features as much as I can.
Ok, let’s go to our resource group in Azure, click on the ipaasdb resource, and in the opened blade, click “Tools” in the top bar. Select “Query editor”, login with the SQL credentials if needed, then run a select query on the customers table. You should see your record

After validating, go on and delete this record to keep the database clean (run: delete from customers)
Now that we have created our Web API and made sure it’s working fine, let’s publish it to our Azure API App. Right-click the project and click “Publish”

Select “Microsoft Azure App Service” as a publish target, then click “Next”
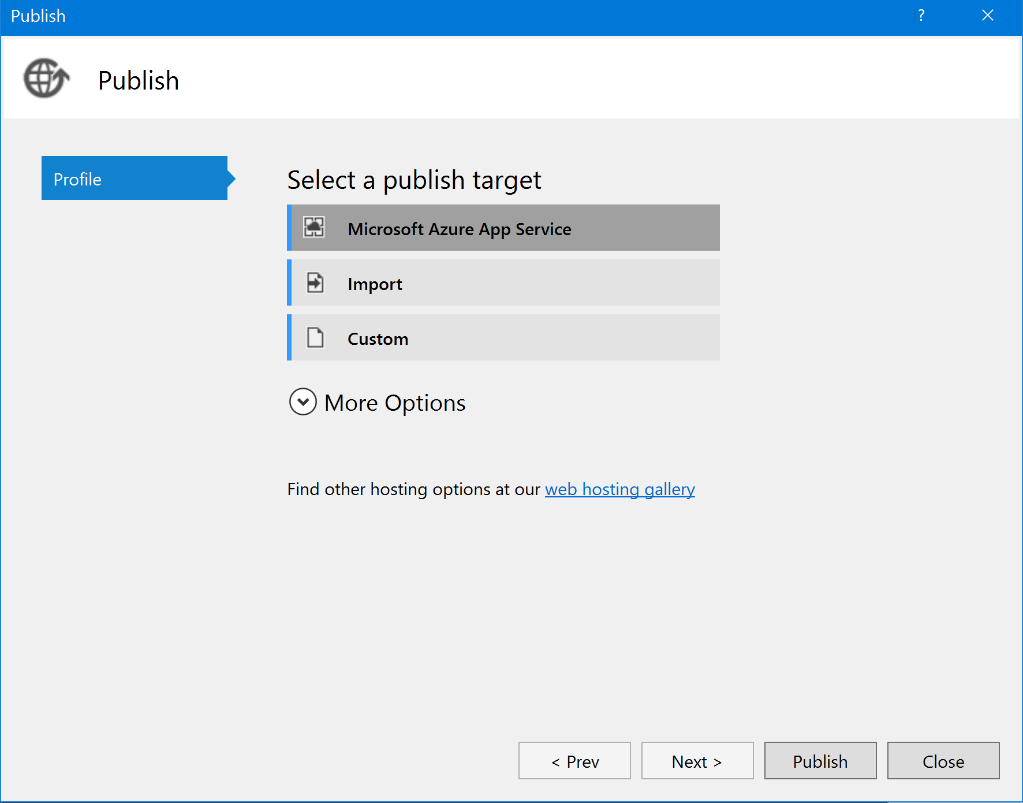
In the “App Service” dialog, select our Azure API App under the DEV-IPAAS-RG resource group, then click “Ok”

You will be presented with the followed screen, you can validate the connection if you want, once you are ready, click “Publish”

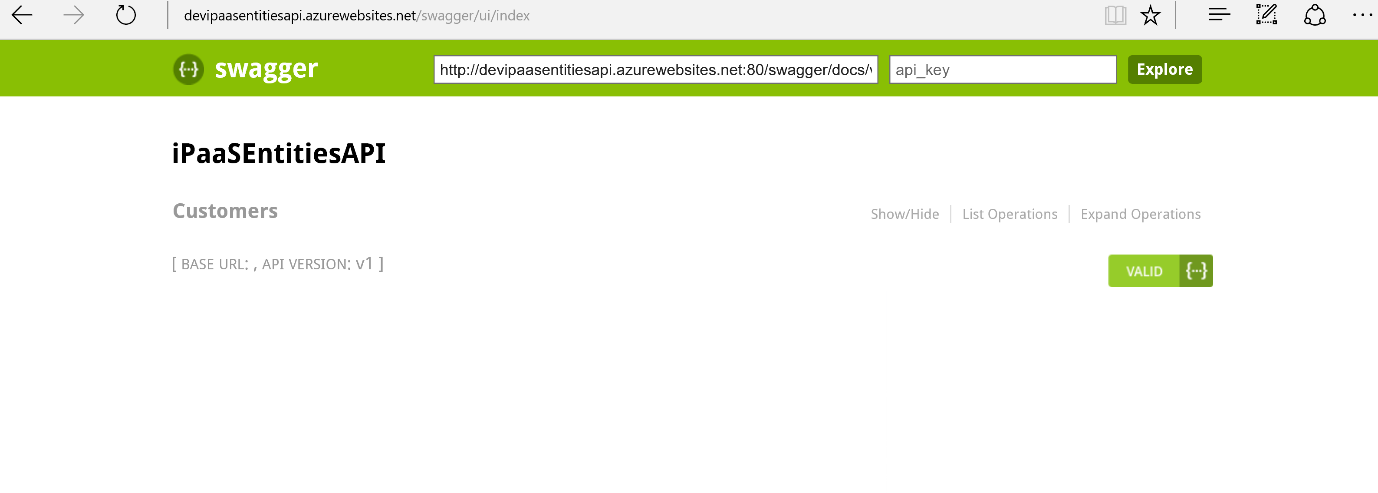
Wait for few minutes until your code is deployed to the API App in Azure. Once done, the API App URL will open automatically

Append “/swagger” to the URL to see the same screen as the one you saw locally. You can even retest creating, reading, updating, and deleting a customer from Swagger UI
Add Our Code to Git
Recall in article 2 when we talked about DevOps practices? It’s time to apply one of them, which is the source control practice. As we said, version control enables teams to share and collaborate on the source code. Now that we have some source code in hand, let’s add it to our source control system chosen when we created the project in vso.
First of all, open the Git CMD command-line tool and navigate to the repository folder (the one we have chosen in Article 2, and the one we placed our Web API project in)

As you can see, the repository folder (C:\Source\iPaaSProject) contains only our Web API (iPaaSEntitiesAPI). Note that this folder is still not added to Git, it’s just there on the file system. Before adding the folder to Git, we need to add a “.gitignore” file. This file instructs Git of what files to ignore when adding files to Git. That’s because normally we wouldn’t want to add binaries, debug, or any generated files to our source control. Luckily, to do that, there is a readily available “.gitignore” on github that we can download and use for any technology.
To do that, navigate to http://github.com/github/gitignore and download the file “VisualStudio.gitignore”

Rename the file to “.gitignore” and place it directly under the repository folder

To add files to Git, first we need to stage them. If you are coming from a TFS background, that’s like adding them to TFS, but without checking-in the changes. To do that, we can use the command:
git add .

The “.” Indicates adding all files, including updates and deletions. After that, we need to commit the changes to the local repository. That’s similar to checking-in the changes in TFS, but only in the local repository. To do that we need to write the command:
git commit –m “comment here”
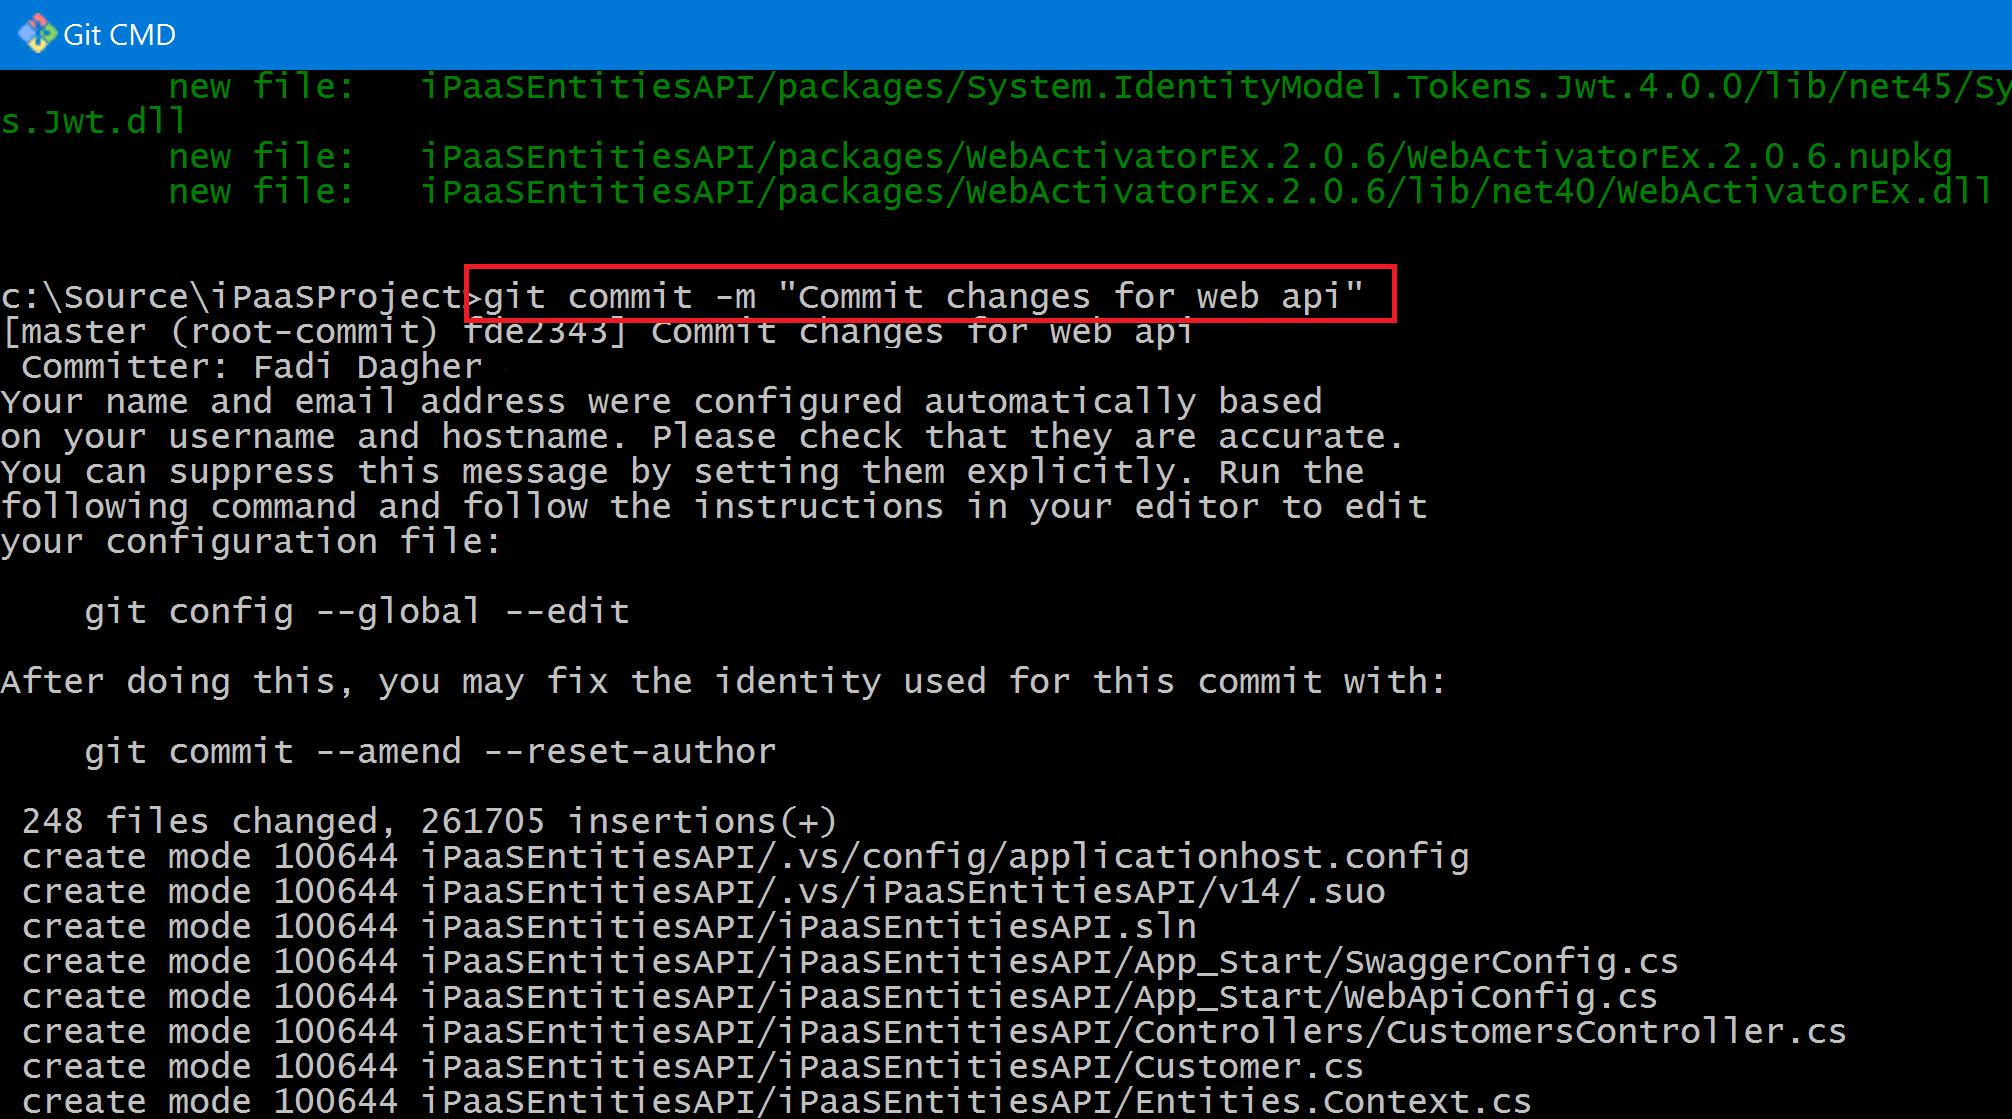
The –m is used to add a comment to the commit.
Finally, we need to push our changes to the remote repository (recall that Git is a distributed source control system, so you have a remote and local repositories). To do that, we use the command:
git push

At any point, if you want to know the current status of your code, you can issue a “git status” command. Another command which you would always be dealing with is the “git pull” command. Assume while working, somebody else has changed the remote repository. Git will not allow you to push your changes as the remote repository is “ahead” of you. So, in that case, you need to issue a “git pull” command before issuing your “git push” command. As a best practice, always do a “git pull” before your “git push”.
To summarize, the sequence to add your code to Git would be:
- git add .
- git commit –m “comment”
- git pull
- git push
Now that our code is in source control, let’s view it on VSO. Navigate to your project VSO folder and see your changes (.gitignore file and iPaaSEntitiesAPI)

One more point, note that we didn’t do any branching setup on Git and hence we are working on the master branch which is the only branch we have. This suffice for now, but once we have multiple environments and teams collaborating, this branching strategy will not work. We will revisit the branching strategy and create multiple branches when we talk about the continuous integration and continuous deployment later in this series.
That’s all for now, in this article we have created the database, the web api, and added our code to the Git source control system. In the next article, we will attach the strings together using Azure Logic Apps.