Hey there, in this article, we’ll explain how you can implement a 100% Microservices based architecture (MSA) using Boomi cloud integration platform, Docker, and Kubernetes. This article is not a tutorial on those platforms, so you should have a fair amount of knowledge on each of them before attempting to read and apply the use case discussed in this article.
Please note that this only makes sense if you have unlimited connection licenses in Boomi. Why? because, as we will explain later in the article, we’ll require many Atoms. Since Boomi consumes connection licenses per atom, the connection licenses consumption will expand drastically as you use more and more atoms. I’m not explaining Boomi licensing model here, but if you know Boomi, you should know what I’m talking about.
MSA Premier
MSA champions creating services that are totally independent, scalable, deployable, and independent. If a service goes down, that shouldn’t cause any other service to fail as a result. The service runtime should be independent from other services so that if the service causes the hosting runtime process to fail, that shouldn’t affect other services.
Boomi Premier
Boomi is a low-code iPaaS. Is is an established leader in Gartner’s magic quadrant for iPaaS solutions. As per my experience, I’ve always seen the platform used as an integration platform on the cloud, synonymous to an ESB on premises. The same runtime (called Atom) would be used to host all services. If you want high availability (HA) and scaling, you can use a molecule, which is nothing but a collection of Atoms. However, in any case, the same runtime would host all of your services / APIs. What does this mean? services are not totally independent and scalable. A mall-functioning service can affect other services deployed to the same runtime. If the runtime goes down for whatever reason, your whole integration layer goes down. A service is not independently scalable. You can’t scale service A, without scaling the whole runtime, including all other services. In short, all services share the same runtime.
Enter MSA
So what can we do to tailor the platform to support a fully MSA? The tip is using an Atom per service. Meaning that an Atom will host one and only one service. To scale a service, we create several Atoms, deploying the service into all of those Atoms. Since deployment is on an Environment, this means an Environment per service as well. So how does this look like?

Steps
In order to make that happen, I’m going to follow the below steps:
- Create the needed components in Boomi. Nothing fancy here, just some dummy processes performing CRUD operations on a customer entity.
- Create an Environment, an Atom, and attach the Atom to the Environment
- Deploy the components & test via postman
- Use Docker & Kubernetes to automate steps 2 & 3 & scale the deployment
Creating the Boomi Processes
As we said, nothing fancy here. We’ve just created four processes which mocks CRUD operations against a customer entity. The four processes will constitute our Customer Microservice. Below is a snapshot of the full structure, as well as the Get Customer process:
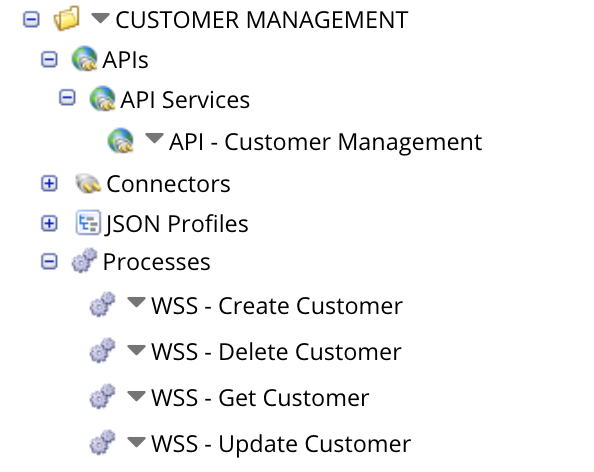

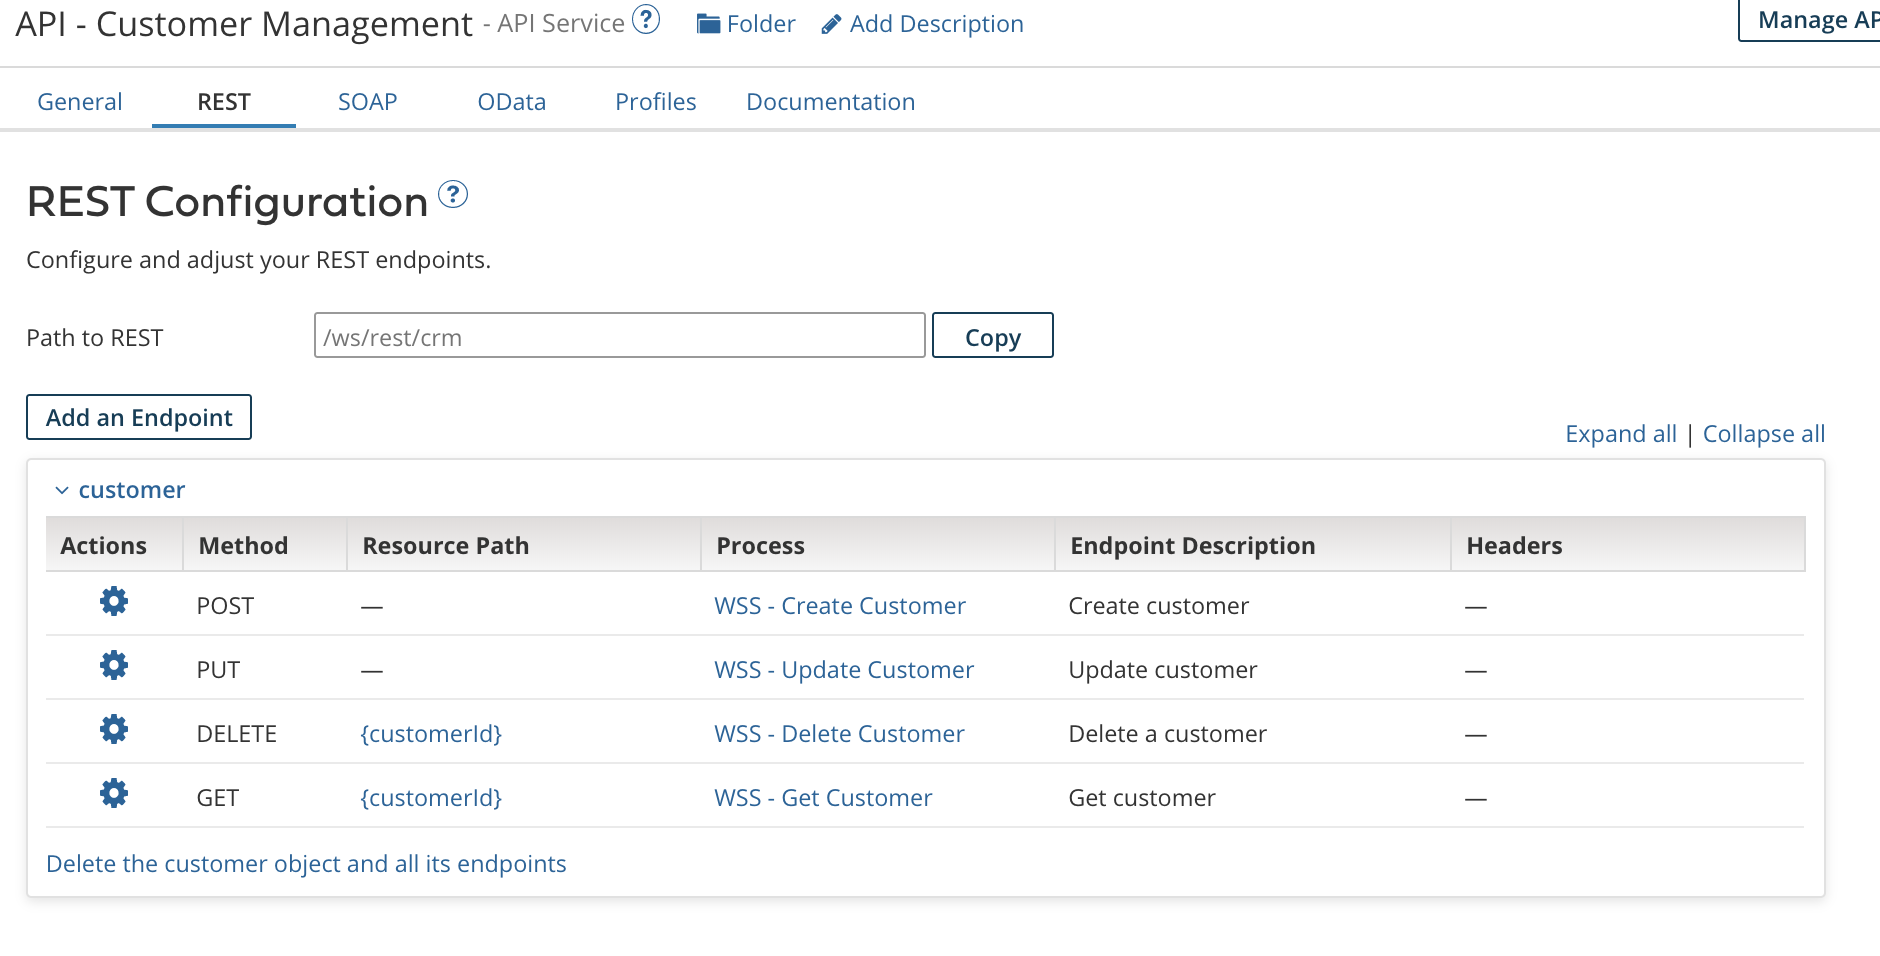
If you notice, I’ve created an API component as well which allows me to give a Restful URLs to the APIs created. This is entirely optional as you could use the auto-generated URLs for your processes. To use the API component you need to have the appropriate licensing in Boomi.
Create an Environment, an Atom, and attach the Atom to the Environment
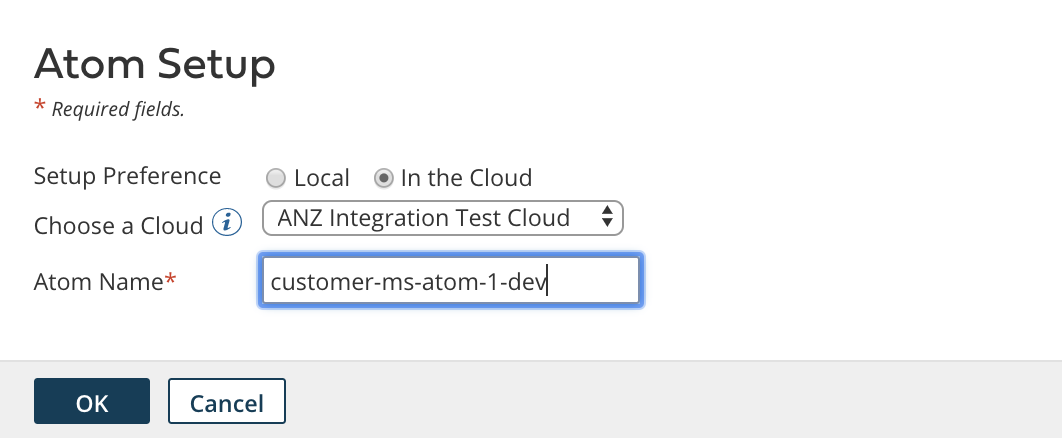
Next is creating an Environment, Atom, and Atom attachment. Also, not going into details here. What you need to do is go to Atom Management page, create an environment, then create an Atom. Make sure to select a Test environment type, and select the appropriate Atom location (Cloud or Local) as per your preference. For me, I’ll chose cloud for now to host my Atom on the cloud.
After that, It’s time to attach the Atom to the environment. Select your environment in question, go to the attachments fields, and select your newly created Atom. That’s it!

Now, we need to deploy our components. Just go to the Deploy tab, select your processes, and deploy to the DEV CUSTOMER MS environment. They will be deployed to each and every atom attached to that environment. For us, it’s just the customer-ms-atom-1-dev atom.

One more optional step. If you are using the API component, make sure the API Type under the Shared Web Server tab is set to advanced. Else, leave it as Intermediate.

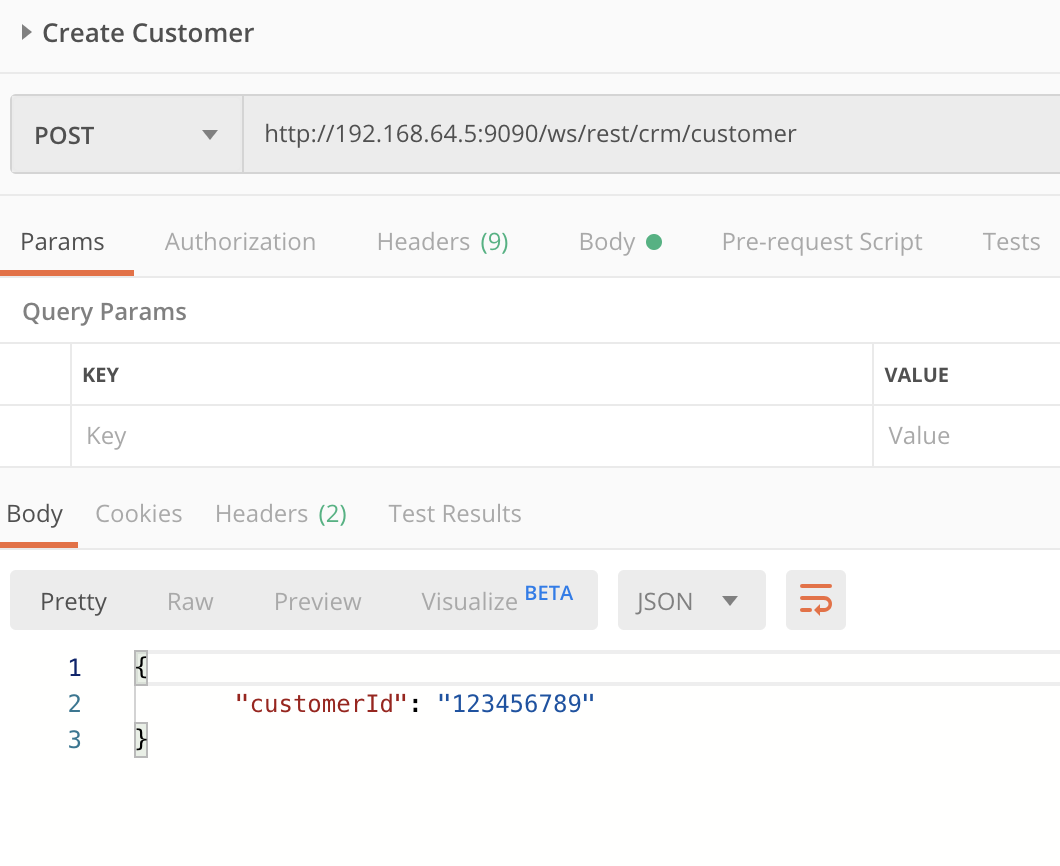
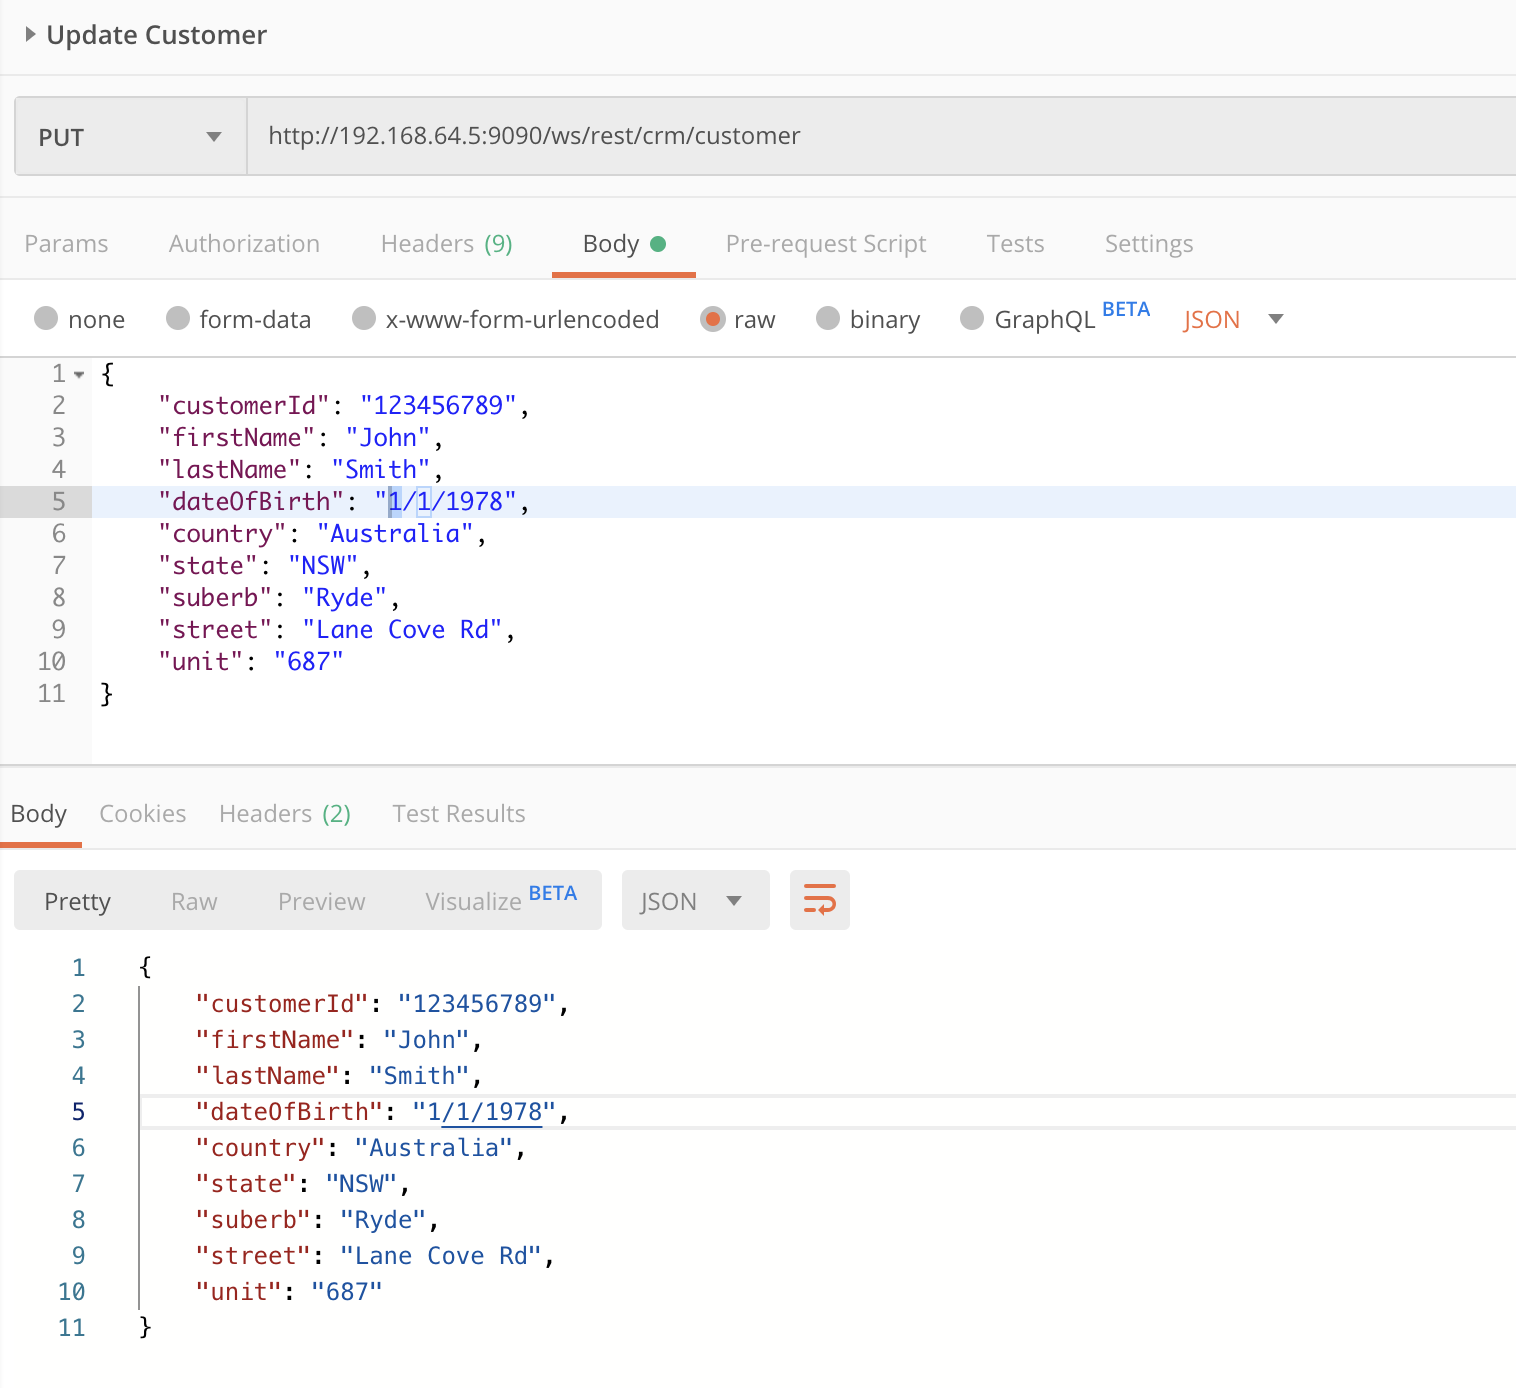
Finally, we can test our microservice using any http client. I’ll use Postman.

So, up until now, we have created a microservice, deployed it in a way which allows it to be independently deployable, scalable, runnable, and totally isolated from other services. However, an MSA can never be feasible without automation. Imagine you have to do this for hundreds or thousands of microservices? it would be impossible to manage, operate, scale in & out, etc…
Enter Docker & Kubernetes…
Use Docker & Kubernetes for Deployment
Docker Setup
Docker, as you might know, is a containerization engine which is a perfect match with MSAs. You can create a microservice, and host it in a lightweight container which is isolated from other containers. To scale? just create multiple containers. Luckily, Boomi provides a Docker image which allows us to create an Atom hosted in a docker container. Excellent! however, this is not enough. What we need is additional plumbing to create an environment for the microservice, attach the created atom to the environment, and deploy the microservice to the environment. The process of having our microservice ready to accept requests should be fully automated.
For that we have created a set of scripts, and a Dockerfile to build a new image which contains those files.
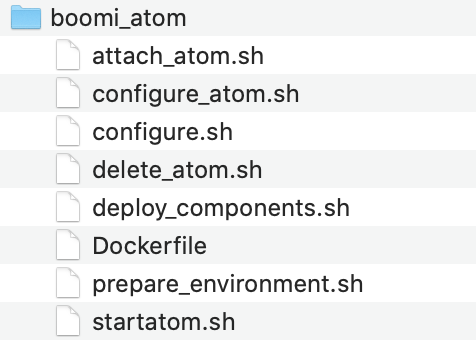
The startatom.sh is an already existing script which runs when the container is created. In that, we have edited it to call configure.sh, which is a script we have created.
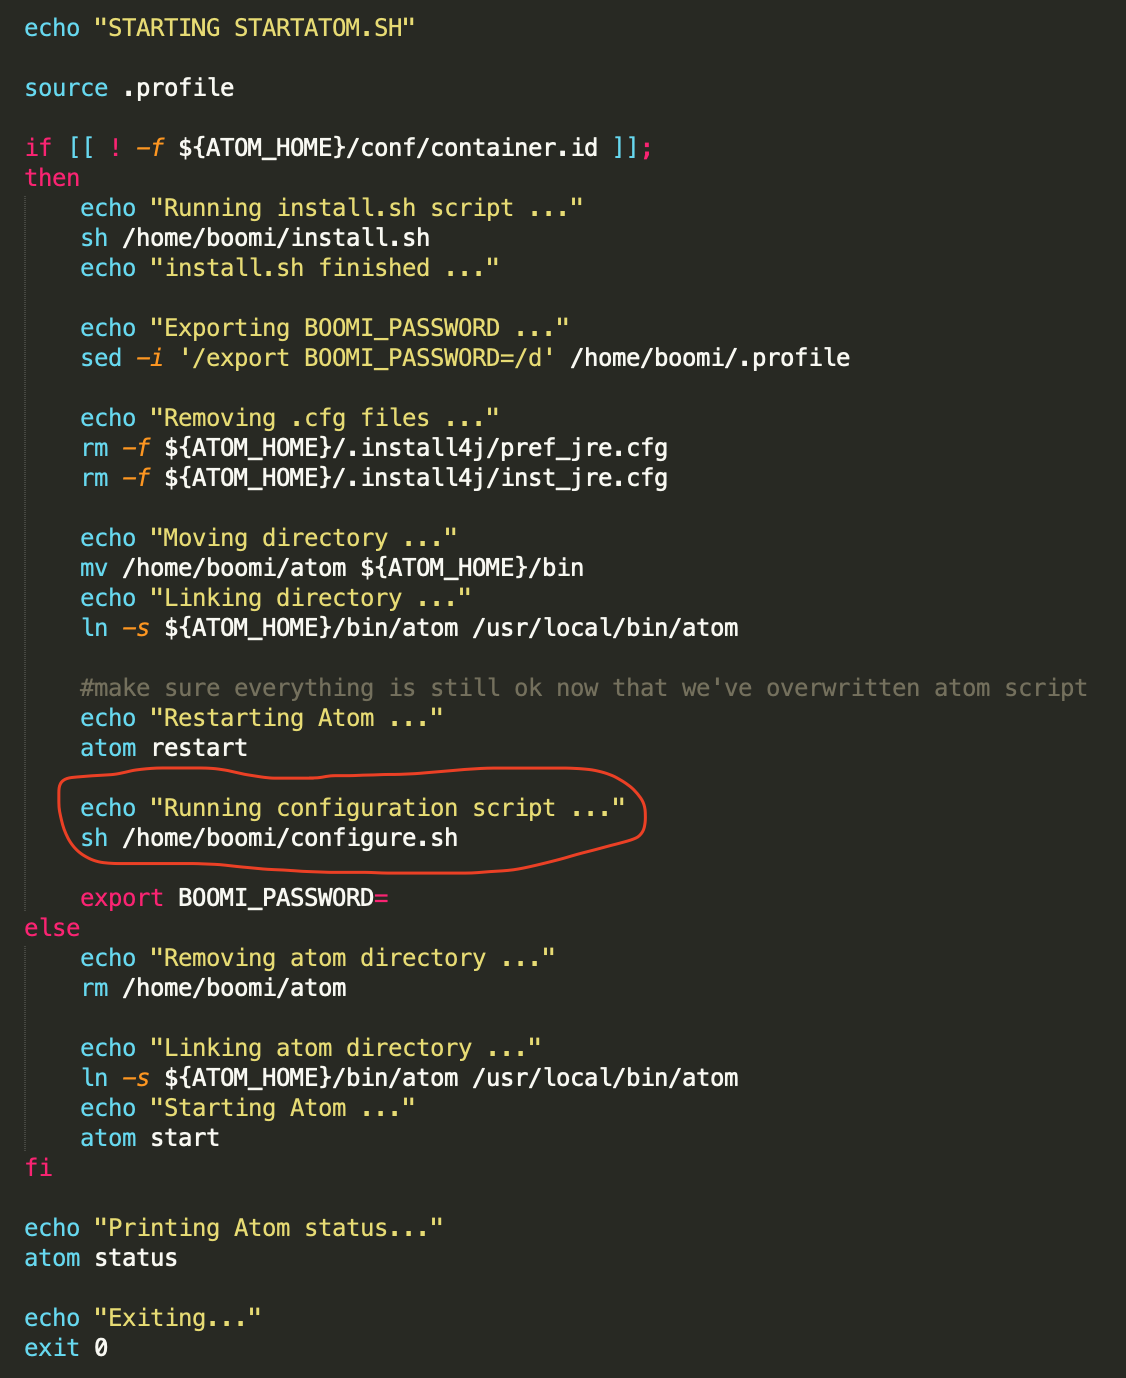
configure.sh is a script which first makes sure the atom is started, then orchestrates all other calls like creating the environment, attaching the atom, deploying the processes, and configuring the atom.
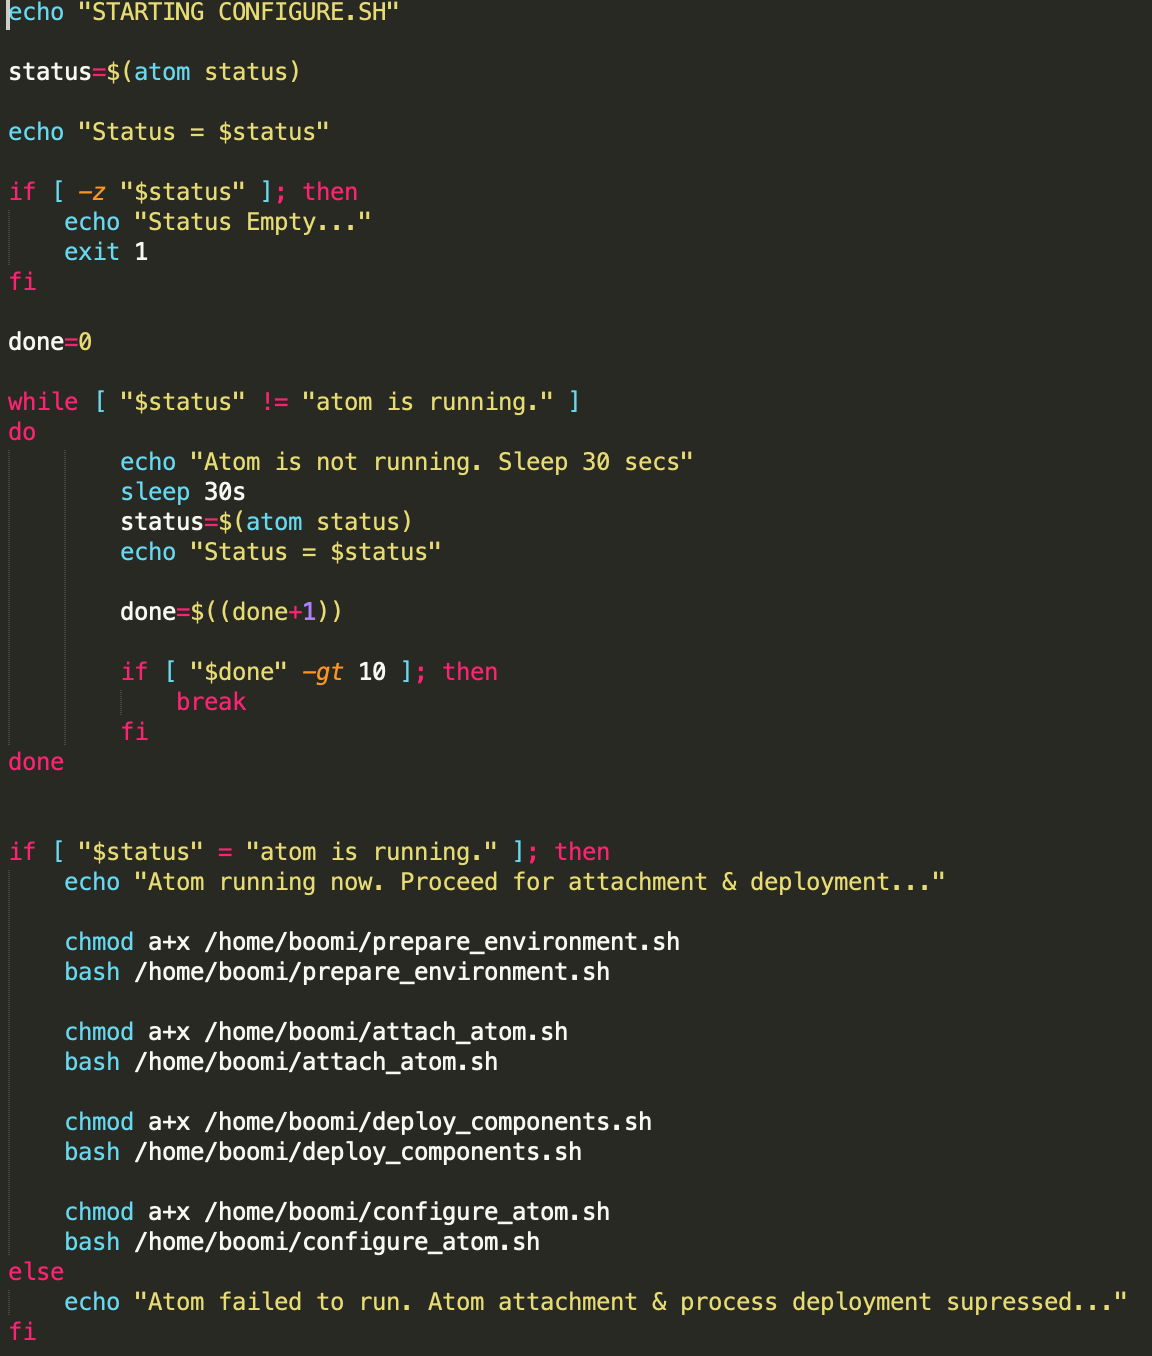
The prepare_environment.sh script creates the environment if not previously created. The attach_atom.sh attaches the atom to the environment. The deploy_components deploys the list of input components to the environment, and the configure_atom is an optional script which configures the atom, such as setting the atom configuration properties.
The Dockerfile would base from the original Boomi image hosted on DockerHub and adds the above mentioned files
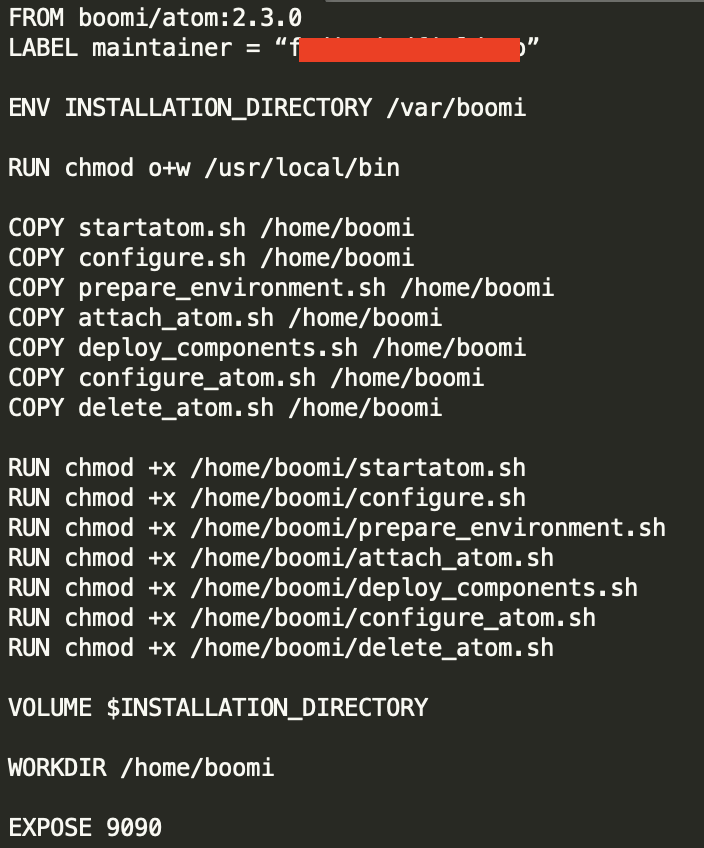
Now it’s the time to create our new image. To do that, run a docker image build command similar to this:
docker image build -t boomi/boomi-atom:2.0.0 .
Where boomi-atom:2.0.0 is your image name / tag. You can chose anything here.
We are in a stage now where we can create a container based on this image feeding the needed Boomi-specific environment variables (mentioned and documented in the DockerHub link above). However, I’m not going to do that. I’ll use Kubernetes to manage creating the containers.
Kubernetes Setup
As mentioned above, I’ll use Kubernetes container orchestration engine to ensure high availability, scalability, and automation for our Boomi containers. So instead of creating the containers using docker, we’ll use a Kubernetes deployment yaml file which ensures all of the above requirements.
For the purposes of the demo, I’ll use minikube, which is a local Kubernetes single-node cluster. You can use AWS, Google, Azure, or any other cloud Kubernetes provider. I’m going to keep it simple for now and use minikube.
Once you install and run minikube, the first thing is to re-build the image using the Docker deamon of minikube. For that, run the following command:
eval $(minikube docker-env)
Followed by the previously mentioned docker build command to build the image:
docker image build -t boomi/boomi-atom:2.0.0 .
This will make your image available to the minikube docker daemon.
Now we are ready to write our Kubernetes yaml files.
As the Boomi Atom requires an admin credentials to be fed into it, first I’m going to store those in a Kubernetes secret. For that I’ve created the following yaml containing my Boomi username, password, and account:

Run the yaml file as follows:
kubectl apply -f boomi-account-secret.yaml
Now that the secret has been created, it’s time to craft the main Kubernetes deployment file:

In this file, note the following:
- I’ve created a service to expose multiple pods over a single IP. I’ve specified the minikube cluster IP as an external IP to expose the service over this IP. The service acts as a load balancer in a Kubernetes cluster.
- I’ve created two replicas as part of this deployment. This can be easily changed and it can be elastically scaled based on metrics such as CPU or memory utilisation.
- On pod termination, I’m running a script to delete the atom. The new pod created by Kubernetes will have their new atom created replacing the deleted one.
- Environment variables needed by the Boomi container are fed in this file. Credentials are sourced from the secret. Atom name is set to the pod id to ensure uniqueness. The to-be deployed components are fed through an environment variable called BOOMI_COMPONENTS, and the environment name to be created is fed through an environment variable named BOOMI_ENVIRONMENT_NAME.
Having the deployment file ready, it’s time to apply it:
kubectl apply -f customer-ms-deployment.yaml
Running this file creates a Kubernetes deployment & service. Wait for few minutes until the containers are created, atoms are installed, and scripts are executed. Meanwhile, you can check for the created pods by running:
kubectl get pods
You’ll get something like:
NAME                           READY   STATUS    RESTARTS   AGE
customer-ms-5564955665-6fnh8   1/1     Running   0          ...
customer-ms-5564955665-sc55r   1/1     Running   0          ...
Note that the to-be created atoms should have the same names as the pods as we configured in the yaml file.
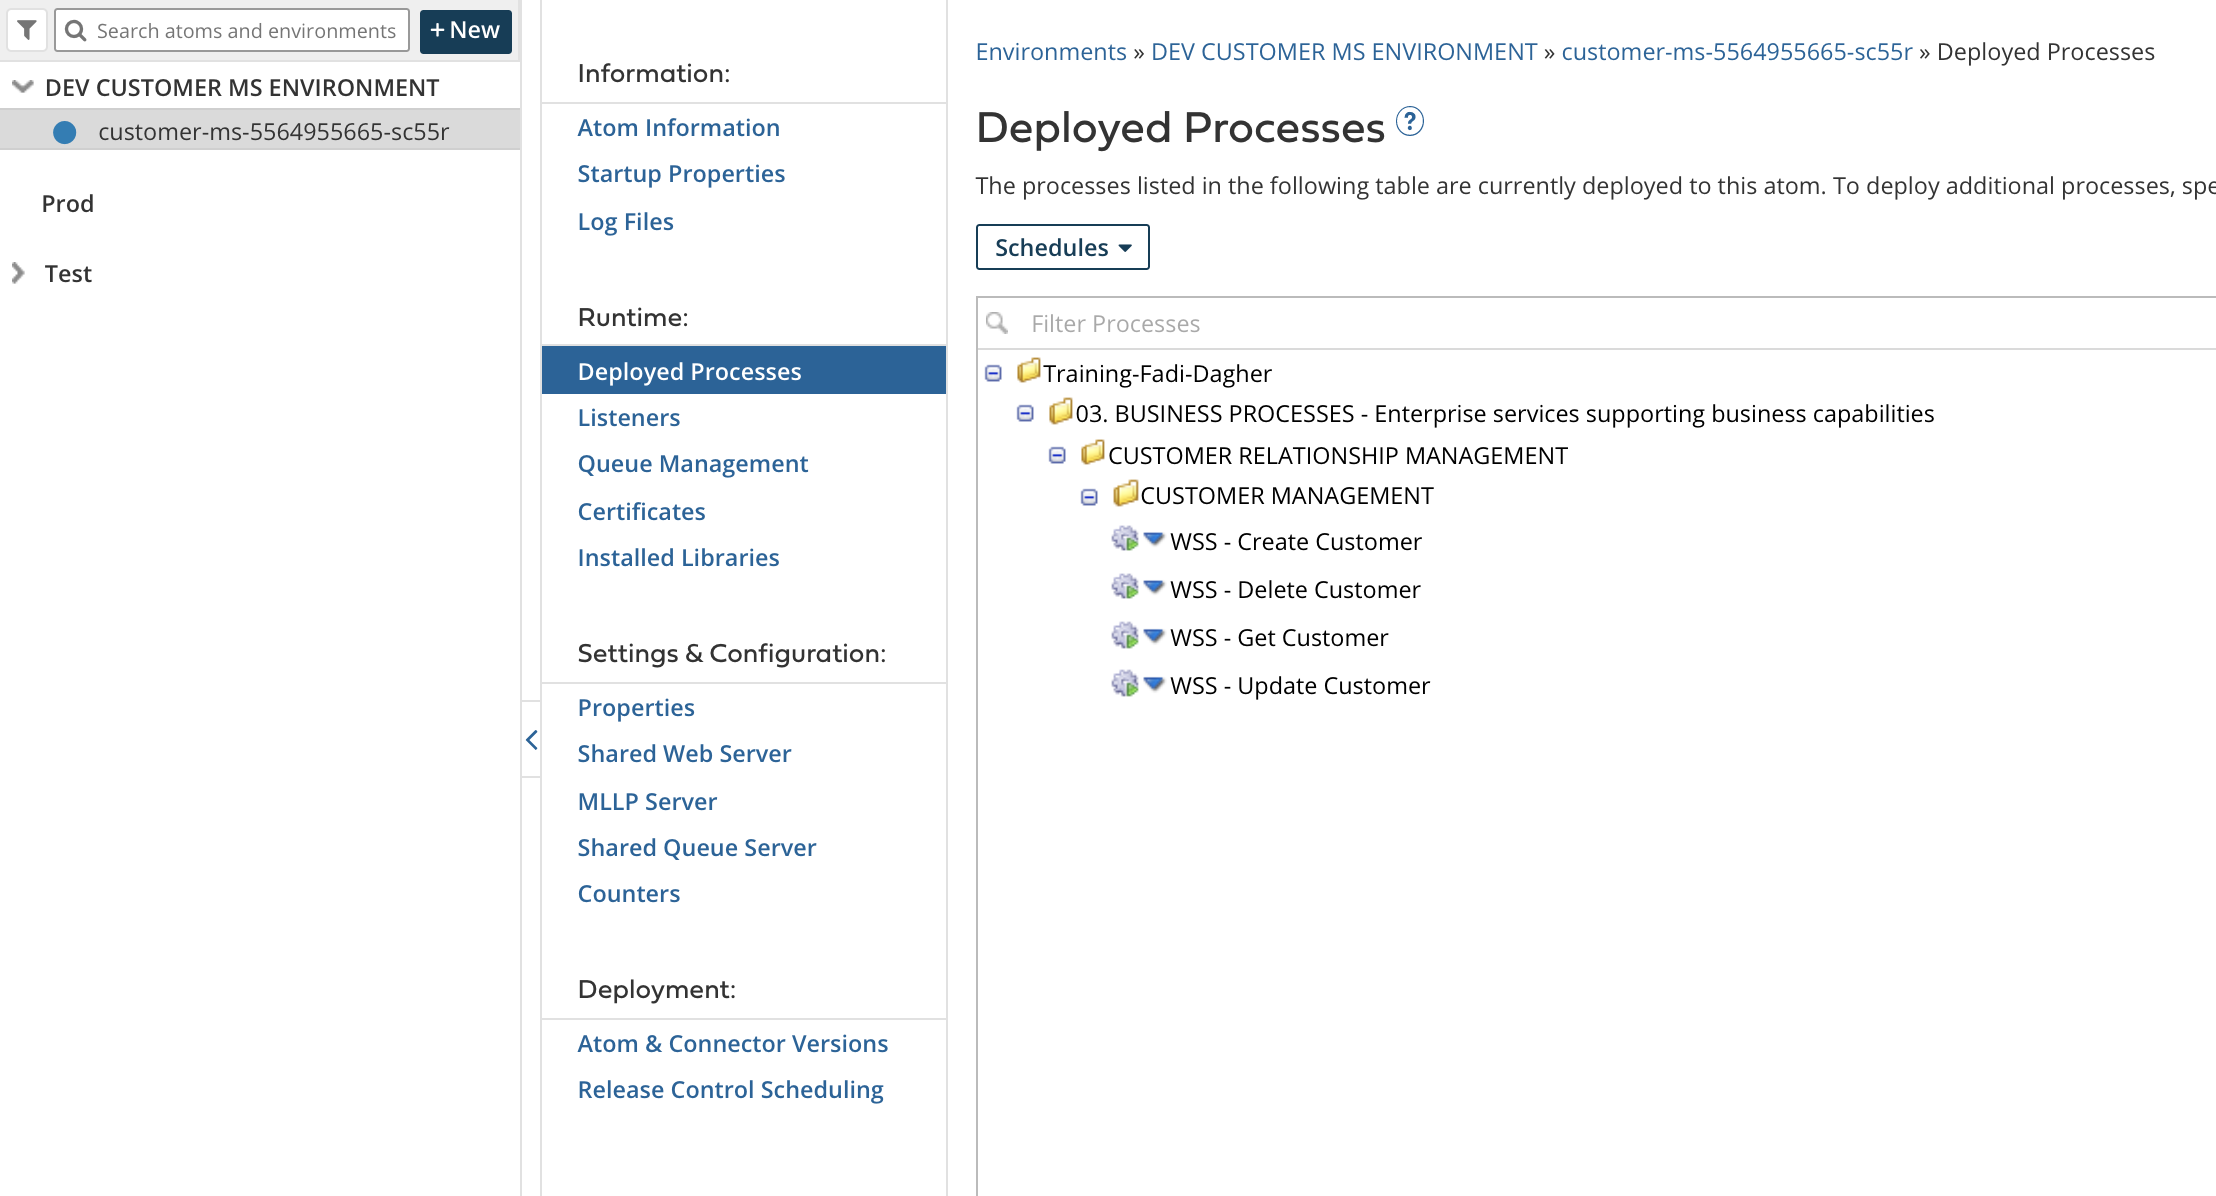
Once done, you’ll see a similar setup to the below snapshot in Boomi Atom Management page. Have a look at the Deployed Processes & Listeners tabs as well to make sure the appropriate processes are deployed successfully

Now we can test our microservice. For this i’ll go to Postman and attempt few calls on each of the microservice endpoints


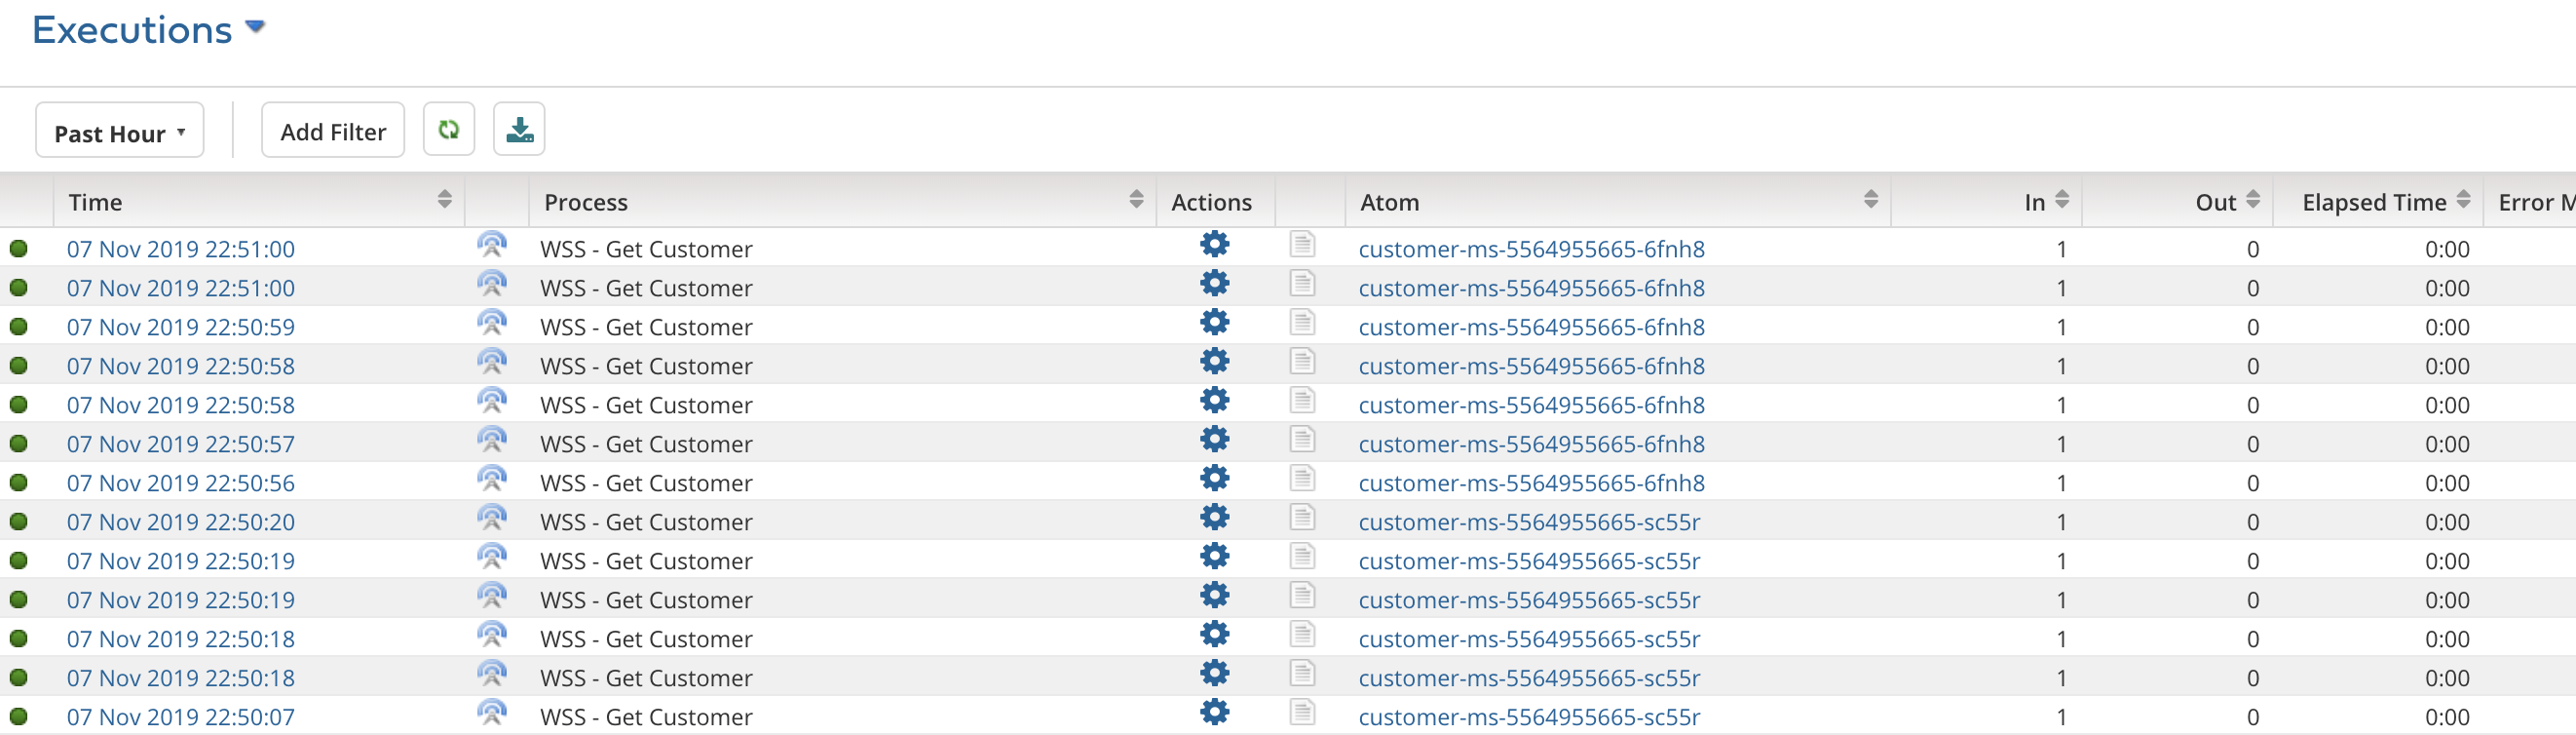
If we go to the process reporting page, we’ll see the executions. Note the different Atoms, this proves that the Kubernetes service is properly routing and load balancing requests across different atoms
Finally, attempt changing the number of replicas in the yaml file and see how that reflects on the atoms under Atom management. For example, setting the replicas to 1 would remove one of the atoms in Atom management. Don’t forget to re-run the kubectl apply command again after updating the yaml file.
In summary, leveraging the official Boomi DockerHub image, writing some plumbing scripts, and a Kubernetes deployment, along with a mindset change in approaching the standard Boomi iPaaS deployment methodology, is enough to implement a fully MSA using Boomi.
References:
- Boomi Offical Docker Hub Image
- Boomi Community Docker Images Documentation
- Article: Scalable Runtime Fabric based on Kubernetes Cluster and Docker
- Ubuntu base Image for Docker Documentation
- Kubernetes Documentation
- Running Local Docker Images in Kubernetes
Attachments
Scripts used in this article can be downloaded from the below attachment archive
Pingback: Auto Scale a Boomi Molecule using Docker & Kubernetes – Fadi Dagher
Hi Fadi,
This is great work, I wanted to try this out and hoping you could share the scripts with me.
thank you
Can you share prepare_environment.sh, attach_environment.sh, deploy_components.sh and other shell scripts required ?
I see your dockerfile doesn’t actually execute any of the scripts you created and I don’t see something like in your deployment file either. How are the various scripts you created executed? Why/how is the pod executing those scripts when it’s not specified in Dockerfile or deployment file? Thanks!
Sorry guys for being dormant. Anyways, if it’s still relevant, I have attached the script files to the article