In our previous article, we showcased how we can implement a fully Microservices Architecture (MSA) using Boomi AtomSphere, Docker, and Kubernetes. In this article, we will revert back to discuss Boomi’s standard scalability and HA solution, i.e the Molecule.
A molecule is Boomi’s offering for high availability (HA) and scalability. Simply put, a molecule is a highly-available cluster of atoms, in contrast to just creating a set of separate atoms. This is beneficial from a licensing perspective as the license count becomes per molecule, regardless of the number of atoms it contains.
Now if AtomSphere molecule gives us a highly-available cluster, then what can docker and Kubernetes add to the table? they can add a very important dimension in the cloud-based era, and that is elastic horizontal scaling!
Boomi’s molecule does not autoscale by default. If you need to scale up, you need to add nodes to the molecule manually. If you want to scale down, you need to remove nodes manually as well. Introducing Kubernetes to the picture gives us the possibility to elastically scale the module based on defined metrics, such as CPU utilisation or memory usage.
Getting Started
To start, we’ll leverage the Boomi molecule image published on DockerHub. In that link, you can find instructions on how to create the molecule using docker commands. It’s worth noting here that there is a difference between installing the first node in the molecule, and the rest of the nodes. That’s why you can see a difference between the docker run command to create the container for the first node, and the docker run command to create the containers for the rest of the nodes.
Before creating the containers, and since the molecule uses a shared folder, we need to create the needed storage folders on the docker host. Those folders will be mounted to each container so that all containers would use the same installation folder. That would be as simple as running the below commands:
mkdir /var/boomi
sudo chmod -R 777 /var/boomi
mkdir /var/boomi/temp
Creating the Molecule Using Docker
I’ll start by creating the molecule using docker following the instructions of the previously mentioned Dockerhub article. To do that, we can run a similar command:
docker run -p 9090:9090 -h MyMolecule_Init \
-e URL="platform.boomi.com" \
-e BOOMI_USERNAME=********** \
-e BOOMI_PASSWORD=********** -e BOOMI_ATOMNAME=MyMolecule \
-e BOOMI_CONTAINERNAME=MyMolecule \
-e BOOMI_ACCOUNTID=********** \
-e ATOM_LOCALHOSTID=MyMolecule_Init \
-e INSTALLATION_DIRECTORY=/var/boomi \
-e LOCAL_PATH=/var/boomi/temp --name MyMolecule_Init \
-v /var/boomi:/var/boomi:Z -d -t boomi/molecule:release
This creates a molecule called MyMolecule using the boomi/molecule image. The initial node name would be MyMolecule_Init
To add nodes to the molecule, on the docker host, run a command similar to the below one as well:
docker run -h MyMolecule_Node1 \
-e BOOMI_ATOMNAME=MyMolecule_Node1 \
-e BOOMI_CONTAINERNAME=MyMolecule \
-e ATOM_LOCALHOSTID=MyMolecule_Node1 \
-e INSTALLATION_DIRECTORY=/var/boomi \
-e LOCAL_PATH=/var/boomi/temp --name MyMolecule_Node1 \
-v /var/boomi:/var/boomi:Z -d -t boomi/molecule:release
This creates a container hosting a molecule node named MyMolecule_Node1 and adds this node to the MyMolecule molecule using the same dockerhub image and the same installation directory used in the initial node setup. To add further nodes, just run similar commands but incrementing the counter suffix at the end of the names.
Here we showcased how to create the molecule using docker commands, however this doesn’t provide any autoscaling capabilities. In the next section, we’ll implement the same steps in Kubernetes and showcase the autoscaling feature within it.
Creating an Auto-scaled Molecule Using Kubernetes
So the idea is mimicking the docker commands using Kubernetes. Since the initial node setup is different from the rest of the nodes, we should be mindful that only once we can deploy using the first node parameters.
How to solve that? the catch would be creating a pod to deploy the initial node, and a deployment to create the rest of the nodes. The deployment would make sure we always have a certain number of pods available. The autoscaling would be enabled on the deployment to scale in/out based on CPU utilisation. Hence, to summarise:
- Pod to create the initial node. No high availability, scalability, etc.. here. If this dies later, it dies, we’ll never run the same installation again.
- Deployment to create the rest of the nodes and maintain High Availability and scalability.
Before we start, we opted to create a secret to host my Boomi credentials and account information:
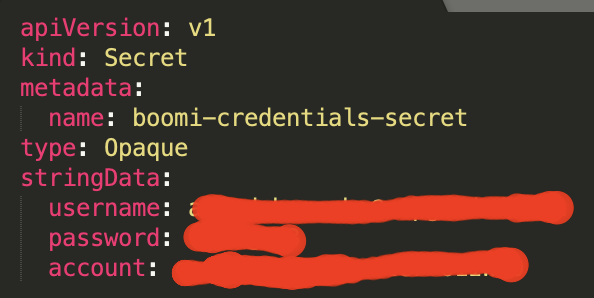
kubectl apply -f boomi-credentials-secret.yaml
Now that the secret is created, we’ll need to create the pod. As usual, using my preferred declarative yaml file

Note here the following:
- On destruction of the pod, i’m stopping the node and unmounting the shared folder.
- I’m setting the same environment variables we set in the docker command previously shown
- I’m using the secret values for my credentials and Boomi account information
- I’m creating the volume and mounting it from the host directly created in the Getting Started section
Next, we need to apply this file in Kubernetes
kubectl apply -f boomi-initial-deployment.yaml
If you want, you can check that the pod was actually created
kubectl get pods

NAME                   READY STATUS  RESTARTS AGE
boomi-molecule-initial 1/1   Running 0        69s
Wait for few minutes and you should see the molecule created in Atom management.

After the molecule is created and the initial node is ready, we can start deploying the additional nodes. I’ve prepared another deployment declarative file as follows

Again, note the following here:
- Added a resources section which is needed for the autoscaling feature in kubernetes. More on that later
- Used the same molecule name used in the pod (by setting the BOOMI_CONTAINERNAME environment extension)
- Commented out the replicas property because we want the autoscaling feature to control the number of replicas created. By default, if replicas is skipped, the deployment will create only one node. In production scenarios, you might want to set this value to a number greater than 1, then set the autoscaling to scale between that number, and a higher number on high loads.
Let’s apply this in kubernetes:
kubectl apply -f boomi-nodes-deployment.yaml
Again, you can check that the pod was actually created
kubectl get pods

NAME                           READY STATUS RESTARTS AGE
boomi-molecule-59f8c9dd4-4srpp 1/1   Running 0       12s
boomi-molecule-initial         1/1   Running 0       13m
Wait a couple of minutes and you should see the node added to the molecule in Atom management.

Going forward, you can keep the initial node, or you can get rid of it, doesn’t matter. The deployment will be used going forward to create / remove nodes. Just to prove that point, i’m going to remove the initial node:
kubectl delete pod boomi-molecule-initial
If we look at the pods now we’ll see that we are back to only one pod, which is the one created using our deployment. The initial one is gone.
kubectl get pods


NAME                           READY STATUS  RESTARTS AGE
boomi-molecule-59f8c9dd4-4srpp 1/1   Running 0        2m27s
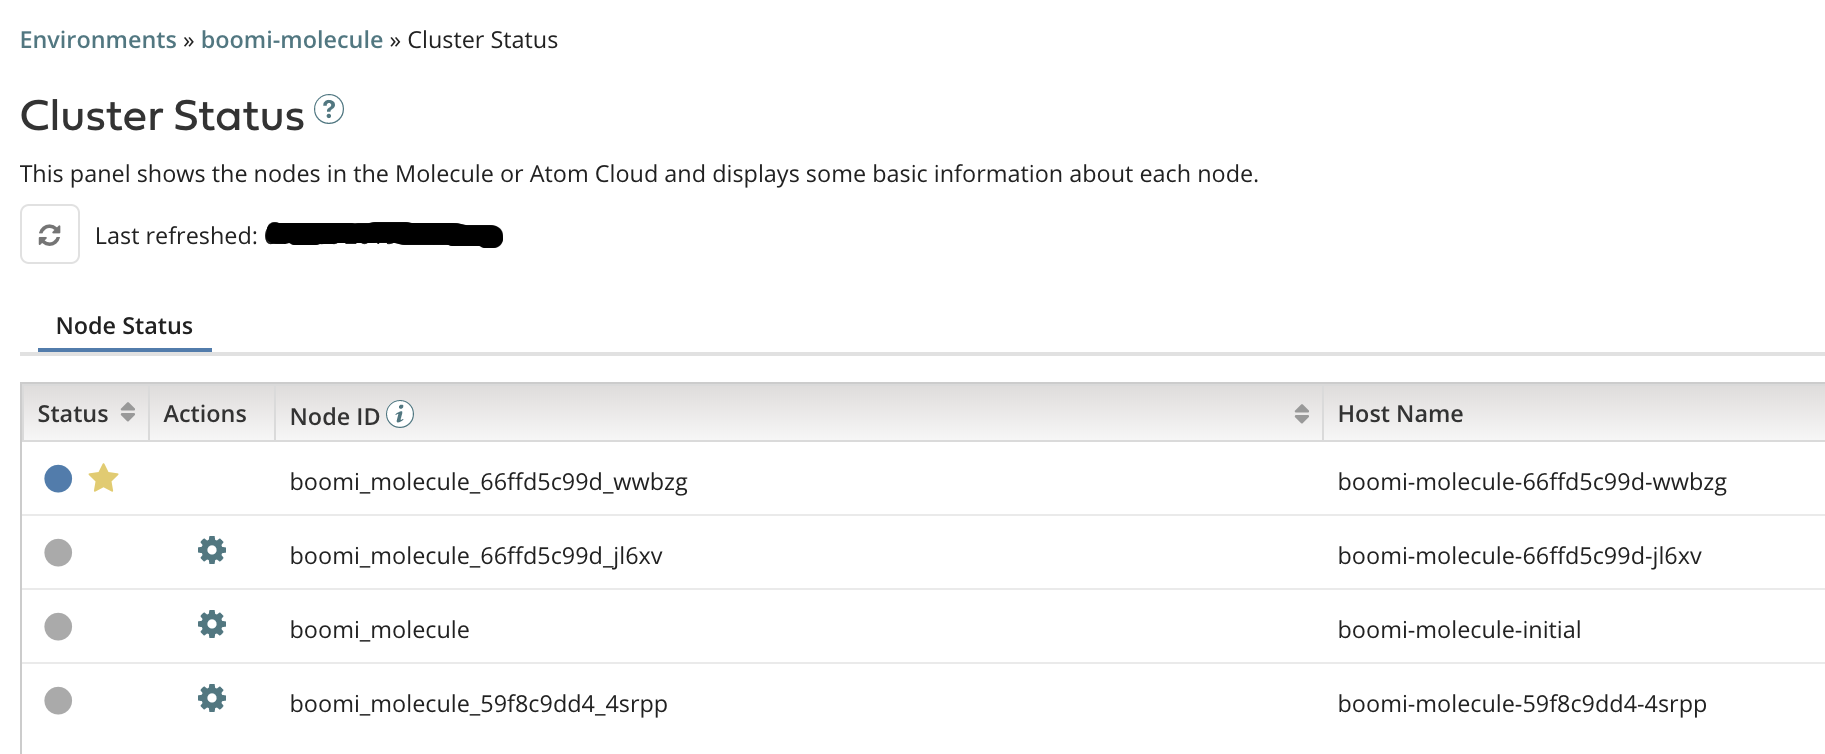
If we look at the Atom management page, we’ll find that the initial node is offline:

Autoscaling
To autoscale in Kubernetes, we need to use Horizontal Pod Autoscaler (HPA) feature. The HPA allows us to scale the number of replicas up and down based on CPU utilisation or any other metric, such as memory consumption. For our example, i’ll stick with CPU utilisation. Before using HPA, we need to enable the kubernetes metrics server on our cluster. To do that, run the below command:
minikube addons enable metrics-server
Defining an HPA is similar to creating any other resource in kubernetes. So i’ve created a yaml file defining the HPA as follows:

Note the following:
- Pointed the HPA to our boomi-molecule deployment
- Defined the minimum replicas to be 1, and the max to be 2. I’ve been a bit conservative here as i’m using my local machine.
- Defined CPU utilisation as the metric to base the autoscaling on. I’ve set the percentage to 25%. i.e, whenever the CPU utilisation goes over 25%, the number of nodes will go up to 2, whenever it goes below 25%, the number of nodes goes back to 1.
Now it’s time to apply the HPA in kubernetes
kubectl apply -f molecule-nodes-hpa.yaml
Wait some time until info gets collected, then retrieve the available HPAs:
kubectl get hpa

NAME               REFERENCE                 TARGETS MINPODS MAXPODS REPLICAS AGE
boomi-molecule-hpa Deployment/boomi-molecule 1%/25%  1       2       1        25s
the 1% means our actual CPU utilisation is 1%, the 25% is the limit where the autoscaling will kick in.
We can even dig deeper into the HPA and view more interesting statistics
kubectl describe hpa boomi-molecule-hpa
...
Conditions:
Type             Status   Reason             Message
----             ------   ------             -------
AbleToScale      True     ReadyForNewScale   recommended size matches current size
ScalingActive    True     ValidMetricFound   the HPA was able to successfully calculate a replica count from cpu resource utilization (percentage of request)
ScalingLimited   False    DesiredWithinRange the desired count is within the acceptable range
Now it’s time to cause the HPA to scale out. For that, we just logged into our pod and ran the below command:
yes > /dev/null &
This will cause the CPU utilisation to go over 100%. To validate that, wait for some time and run the get hpa command again
kubectl get hpa

NAME               REFERENCE                 TARGETS MINPODS MAXPODS REPLICAS AGE
boomi-molecule-hpa Deployment/boomi-molecule 59%/25% 1       2       2        19m
Note that the number of replicas changes to 2 after the targets goes above 25%. If we try getting the pods now, we’ll see that there’s a new pod initiated
kubectl get pods

NAME                            READY STATUS  RESTARTS AGE
boomi-molecule-66ffd5c99d-jl6xv 1/1   Running 0        11s
boomi-molecule-66ffd5c99d-wwbzg 1/1   Running 0        14m
Going back to Boomi Atom management, we should see a new molecule node added

Finally, let’s try scaling down. Log in again to the pod and run the below command:
killall yes
This will cause the process causing the high CPU utilisation to terminate and after some time, the CPU utilisation of the pod should go down to less than 25%
If we try getting the HPAs
kubectl get hpa

NAME               REFERENCE                 TARGETS MINPODS MAXPODS REPLICAS AGE
boomi-molecule-hpa Deployment/boomi-molecule 7%/25%  1       2       1        26m
Now, we should see that we only have one pod running and the second one should be terminated
kubectl get pods

NAME                            READY STATUS  RESTARTS AGE
boomi-molecule-66ffd5c99d-wwbzg 1/1   Running 0        31m
Again, going back to Boomi Atom management, we should see the latest molecule node going offline.
Summary
This should conclude our article where we have showcased how to leverage the Boomi molecule with docker & kubernetes to enable autoscaling. In short, we followed the below steps:
- Preparation steps such as creating a secret in Kubernetes and a couple of directories to host our molecule files.
- Pod in Kubernetes to create our molecule and initial node
- Deployment in Kubernetes to create the rest of the nodes. HA & Autoscaling will be enabled on the deployment.
- Used the Horizontal Pod Autoscaler (HPA) feature in Kubernetes to enable autoscaling based on CPU utilisation.
Following the previous steps, we can claim that we’ve got ourselves a Boomi Atomsphere Molecule on steroids!
This is really great. Thanks for sharing. Now how great would it be to turn this into a k8s Operator??? Do you have a code repo you can share too? Please reach out to me if you would be interested in collaborating on an Operator for this.
Hi Fadi,
I went through your article as well as the Boomi documentation https://help.boomi.com/bundle/integration/page/Molecule_Docker_Image_c699cb30-da58-4673-bfe2-68e0b4bfe3ab.html for installing the Boomi Docker molecule image by running the below commands.
However even the Boomi molecule is installed by the first command, the second molecule node is not added to the Boomi molecule. Although I can see the two containers spin-off successfully however the Molecule is still shown with only one node.
Can you please review the below commands and see if there is any obvious mistakes/issues. Really appreciate your feedback:
docker run -p 9090:9090 –privileged -h Mak-Docker-Molecule -e BOOMI_USERNAME=mpare@osius.com -e BOOMI_PASSWORD=****** -e BOOMI_ATOMNAME=Mak-Docker-Molecule -e BOOMI_CONTAINERNAME=Mak-Docker-Container -e BOOMI_ACCOUNTID=osiconsulting-7LUNSK -e ATOM_LOCALHOSTID=Boomi-Molecule-Host –name Mak-Docker-Molecule -e INSTALLATION_DIRECTORY=/var/boomi -e LOCAL_PATH=/var/boomi/temp -v /var/boomi:/var/boomi:Z -d -t boomi/molecule:3.0.0
docker run -h Mak-Docker-Molecule01 -e BOOMI_ATOMNAME=Mak-Docker-Molecule01 -e BOOMI_CONTAINERNAME=Mak-Docker-Container -e ATOM_LOCALHOSTID=Mak-Docker-Molecule01 –name Mak-Docker-Molecule01 -v /var/boomi:/var/boomi:Z -d -t boomi/molecule:3.0.0
Sorry for the late reply as I have been dormant. If my answer is still relevant, you can follow the instructions on Boomi’s official docker hub repo, that will work for you: https://hub.docker.com/r/boomi/molecule
First of all, let me congratulate you on writing an amazing article. I just have one question. Please note that I am not a container expert, so please educate me if I state anything illogical.
Are there any benefits to this approach compared to the below one?
Have a molecule set up on a Virtual Machine Scale Set (Microsoft Azure) with autoscaling enabled based on the CPU utilization. We may have to add an extension (not the Boomi extension) to the VMSS which will basically attach the shared storage (molecule installation) on the VM instance and start the molecule node whenever a new VM instance comes up based on the set-up configuration.
Thanks in advance.
Hi Varun, sorry for my extremely late reply as I was dormant in the past period. Please tell me if my response is still relevant.
Regards,
Fadi