In the previous articles, we created our full functional solution targeted for our development environment. The next logical thing to do is to deploy everything to a test environment, then to production for example. Would we want to do that manually? Off course not as that’s a time consuming / error prune process. Our best bet is to automate the deployment, and luckily, Microsoft Azure gives us all the tools to do that.
The major mechanism for automating the deployment of Azure artefacts is the Azure Resource Manager (ARM) templates. ARM templates are json files that contains a definition of the resources you want to create. Once you create an ARM template, for instance for the Logic App, you can run it via a PowerShell script command which creates the Logic App as per the definition found in the ARM template.
In short, the ARM template contains several important sections which you need to know about:
- Parameters: those are the variables you want as “input” to the template. For example the resource name, or target environment, or the App Service Plan.
- Variables: same concept as variables in any programming language. Those are the variables used in several places inside the template
- Resources: Those are the resources you want to create. You might group multiple resources in one file, or separate them into multiple files
- Outputs: Those are the outputs of the resource creation in case you are running the templates from a “master” template file and an output of a template would be an input to another template.
Besides the template file, and in case we have some parameters, we should have a parameters file that contains the input parameters values. Typically, the name of the parameters file would be something like: templatefilename.parameters.json
For more information about ARM Templates, please refer to https://docs.microsoft.com/en-us/azure/azure-resource-manager/
Also, as of now, ARM templates doesn’t support the full automation capability. So there would be some tasks that we would need to write PowerShell scripts in order to make them happen. We’ll touch on that later in this article.
So, from where do we start? Luckily, the Azure portal generates a single ARM template file for the whole resource group that we can start from. If we go to our resource group blade, on the left-side menu, under “Settings”, we have a link called “Automation script”. Click on that and you’ll get a single template file containing all resources found in the resource group. You’ll get also the parameters file plus examples on how to run those files to create the resources.

What’s of interest to us here is the template file as we can use it as a “starting” point in creating our ARM templates. The strategy here is simple:
- Copy the file into any text editor such as Visual Studio.
- For each resource, create a separate template file and port the relevant sections (resources, parameters, variables) into that file. Also, create a resources file for that.
- Optimize the file as it won’t be optimal. Most of the parameters and their usage can be improved as well as their naming.
The target is to create a template and parameters file that can be used to create any resource of the target type. For example, a template file that you could use to create logic app, a template file that you could use to create a storage account, and so on. This way you could re-use those files for all future projects, not only this one. Luckily also, there is a repository of such ARM templates on GitHub that you could use alternatively without doing this “manual” step: https://github.com/Azure/azure-quickstart-templates
For the sake of this demo, I’ll show you how I extracted and cleaned a single resource, then will present the final outcome for all other resources. Also, will show you the PowerShell scripts created to perform some tasks which are still not supported via ARM templates.
Let’s for example, extract the storage account part from the consolidated file and create an ARM template that creates a storage account. Script a new json file and paste all contents of the consolidated file into. Remove all parameters and resources not related to the storage account. You should end up with:

As you can notice, this needs serious enhancements. First, the environment (“dev”) is part of the storage account name parameter, let’s fix that name and use a shorter one. Rename “storageAccounts_ipaasstorageaccountdev_name” to simple “name”. In the resources section, change the parameter name also for the “name” attribute.
Second, remove the “comments” attribute as it’s not needed.
Third, notice the location is hard coded to “australiaeast”. Let’s change that to use the parent resource group location, whatever is that. You can do this using the function: resourceGroup().location
Fourth, notice the “sku” is hard code to standard also. Let’s add a new parameter for that and use the parameter value. The final file should look as follows:
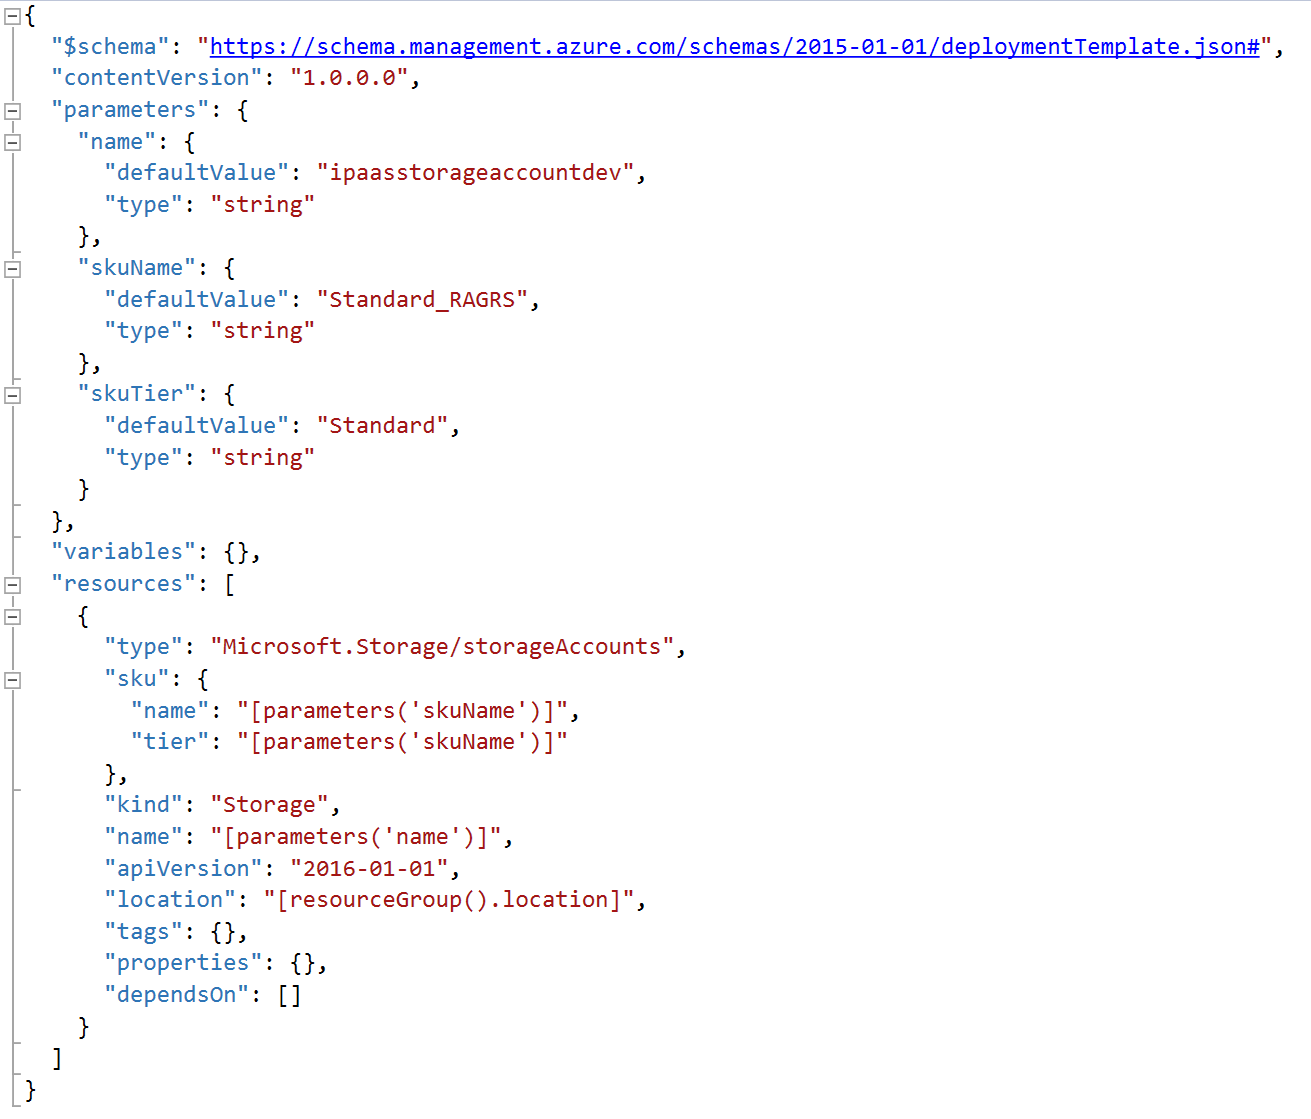
Create a directory called Azure, under it create a sub-directory called “StorageAccount”, then save this file into it under the name “azuredeploy.json”. You don’t have to follow this exactly, we can create your own preferred structure, but for me that’s the most convenient structure.
Let’s create the associated “.parameters” file. Same way, create a new json file and paste the text inside the “Parameters” tab of the “Automation Script” section in the Azure portal. Strip all irrelevant parameters, you’ll be left with the “storageAccounts_ipaasstorageaccountdev_name” parameter only. Rename it to “name”. Copy and paste it twice to create the skuName and skuTier parameters, then fill the values as you would want them. Your file should look like:

Save the file next to the template file with the name: azuredeploy.parameters.json
To validate the ARM template, open the PowerShell command, navigate to the template files directory, then run the below command:
Test-AzureRmResourceGroupDeployment -ResourceGroupName “DEV-IPAAS-RG” -TemplateFile “azuredeploy.json” -TemplateParameterFile “azuredeploy.parameters.json”
PS: You would need to Login first before attempting to do any operation on Azure. To log in, use the Login-AzureRmAccount command, then provide your credentials in the popup window.
Ok, if the validation command runs without any error, that means the template is valid. It’s time now to deploy. Before deploying, rename the storage account to something other than dev just to see a new storage account created. For me I removed the “dev” suffix and added “test” instead.
To deploy the ARM template, run the below command:
New-AzureRmResourceGroupDeployment -ResourceGroupName “DEV-IPAAS-RG” -TemplateFile “azuredeploy.json” -TemplateParameterFile “azuredeploy.parameters.json”
After the deployment is done, you will get the results as follows:

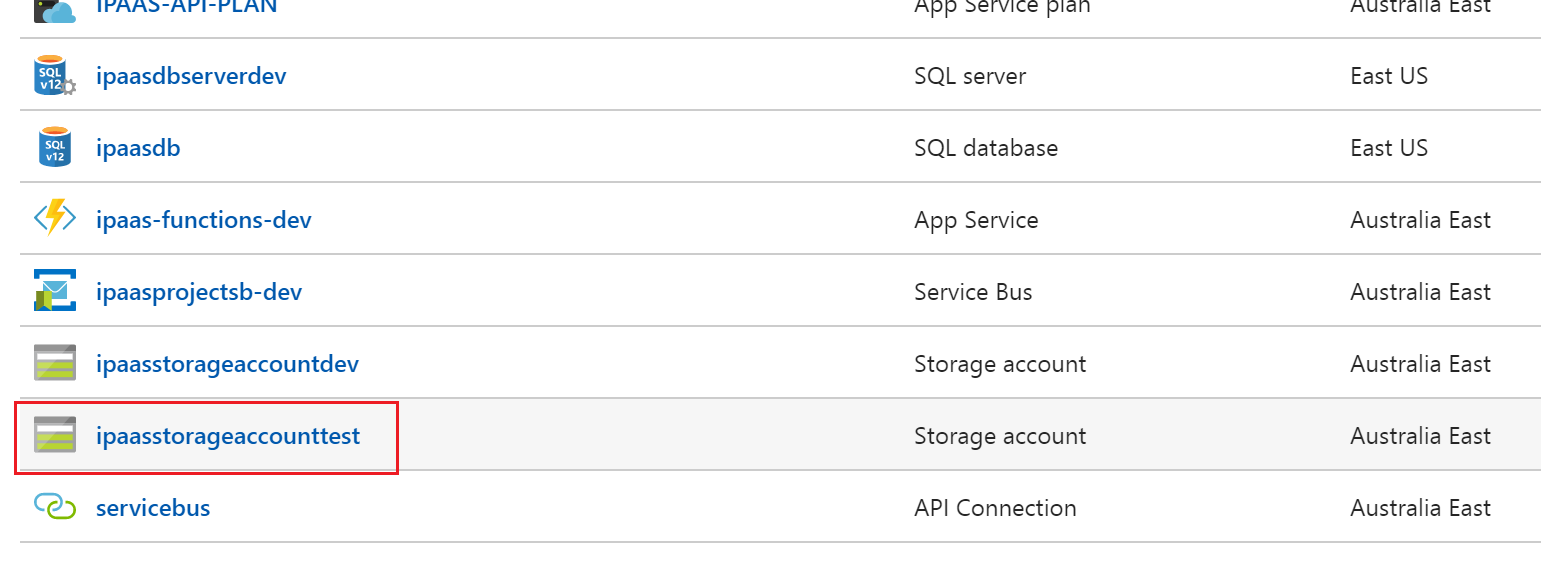
Switch back to the Azure portal to see the new storage account created:
Ok, we’ve validated our ARM template works, delete this storage account as it’s not needed.
Similarly, you can continue to create the other ARM templates for the SQL server, SQL DB, App Service Plan, Function App, Service Bus, and Logic App. I’ll not show that here, but I’ll summarize next the things you need to do differently for other resources. Also, I’ll attach all the templates and scripts to this article. A nice article showing how to create an ARM template can be found at the following location: https://docs.microsoft.com/en-us/azure/azure-resource-manager/resource-manager-create-first-template
Resource Group
The resource group is to be created via a PowerShell command. The command is:
New-AzureRMResourceGroup -Name $Name -Location $Location –Force
Storage Account
As of the time of writing this article, we can only create the storage account using the ARM technique. To create and populate the storage account table, we need to write a PowerShell script. The script is attached here, but in short, you have to use the “New-AzureStorageTable” command to create the table:
$Account = Get-AzureRmStorageAccount -Name $StorageAccountName -ResourceGroupName $ResourceGroup
$table = New-AzureStorageTable -Name $TableName -Context $Account.Context -ErrorAction SilentlyContinue
And use the “Add-StorageTableRow” command located in the “AzureRmStorageTable” module (to be installed) to add a row:
Add-StorageTableRow -table $table -partitionKey $partitionKey -rowKey (“WebAPIURL”) -property @{“URL”=”https://$($environment)ipaasentitiesapi.azurewebsites.net”}
Azure Functions
Azure functions can be deployed using a combination of an ARM template (to create the function app) and a normal Web App publishing to create the functions. To create the functions, we can download the functions content from the azure portal as a zip file, then issue a PowerShell command to publish the content to the empty Web App (or Function App in this case). The easiest way to download the functions content is to go to the azure portal function app blade, then click Download app content from the top menu:
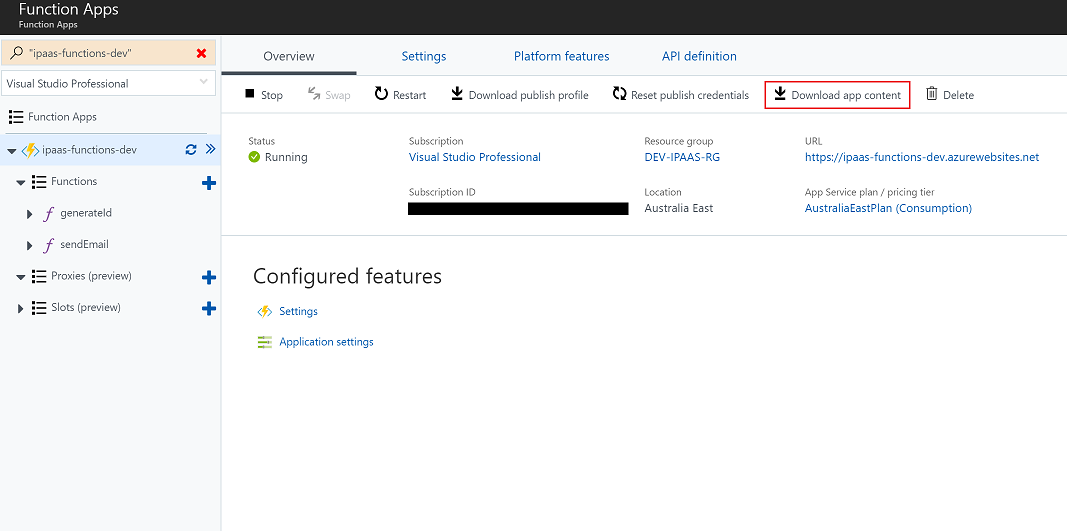
On the popup window, click Download to download the functions content.
After creating the Function App using the ARM template, we are ready to publish the content using the following command:
Publish-AzureWebsiteProject -Package ipaas-functions-test.zip -Name ipaas-functions-test
You might need to log in beforehand using the following command:
Add-AzureAccount
If you have more than one active subscription, then you need to set a default one using the following command also:
Select-AzureSubscription -SubscriptionId {subscription_id_guid}
Summary
This is basically the way to automate your deployments using ARM templates and PowerShell scripts. I’ve attached all relevant files plus two PowerShell scripts to test and deploy the whole Resource Group as part of this article.
In the next article, we’ll go one step further to fully automate our builds and releases using a continuous integration – continuous delivery (CICD) pipeline using VSTS